Pages

Saturday, January 31, 2015

The Card Concept #27

I have a card to share that I made using The Card Concept #27 as inspiration:


I love the ombre "love", the woodgrain background and the heart banner!
I decided to use some of my Reverse Confetti goodies to make my Clean & Layered card...


I started with some Webster's Pages woodgrain patterned paper for my background.
I diecut the journaling card from Documented Confetti Cuts and on it, stamped my sentiments (from Crushin') in PTI sweet blush, lavender moon and CTMH Cotton Candy.
I diecut my Circle Garland Confetti Cuts from three coordinating sheets of Bazzill yardstick
and stamped the solid and outline hearts (from Whole Lotta Hearts) on them using the coordinating inks.

Here's a close-up of the banners:


Thanks for looking!

Thursday, January 29, 2015

CAS(E) This Sketch #108

Today, I have a card to share that I made for
 CAS(E) This Sketch #108 by Gayatri Murali:


For my card, I decided to pair the flamingoes from 
with the In A Big Way sentiment set.


I started with some My Mind's Eye patterned paper as my striped background.
I stamped my flamingoes (while doing a bit of masking) on a vintage cream panel 
and added the sentiment from In A Big Way.

Visit CAS(E) this Sketch to see the rest of the DT's takes on the sketch 
and to play along, if you'd like.
You have until Thursday, February 5th to link up your card.


Thanks for looking!

Wednesday, January 28, 2015

Time to Sparkle

Hi there!
I'm just popping in today to let you know that I have a card up on the Bazzill Basics Blog today.
 
 
Click here to see which dies/supplies I used to make my card.
 
Thanks for looking!

Monday, January 26, 2015

Cleaning up & some stamps for sale

Hey there, friends!

Well, I had a very productive weekend!

I spent most of my free time reorganizing/purging/cleaning my craft area – 
and I even did a little painting, too.  :)
I thought I’d share some photos with you…

Now, a year and a half ago, I painted two walls in my basement corner craft area aqua mist.
Well, this weekend, I decided to add some aqua mist stripes to the wall that leads into my area.


What do you think?
I totally love it!

Here's my space. 
We have two tables set up: one for me that faces out into the room and one for my daughter, Sage.
It's suppose to be for her to craft, but she uses it more for playing with her Lego Friends.
I don't mind though... it's still a nice way to spend time together.


So here's my work area.
I have my sewing machine at the one end.


Here's another view.
I keep my stamps in baskets in front of me.
I have a basket for PTI, one for Reverse Confetti and one for all my other stamps. 


I have a caddy for my tools, paintbrushes and pencils, etc.
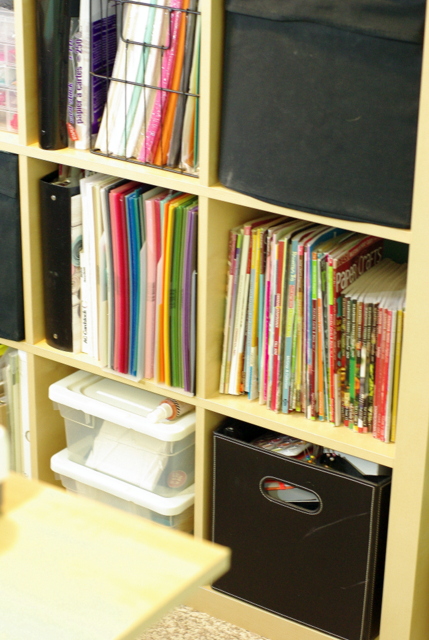
Behind that, I have my 12x12 patterned paper, sorted by manufacturer.


Then, I have my PTI cardstock, sorted by colour.
On my four-tiered rotating shelf, I keep my smaller tools, twine, embossing powder and my PTI inks.


This is my diecutting station, where I keep my smaller trimmer, my ATG gun and my Big Shot.
On the shelf behind that, I have my impression plates, punches & embossing folders.
Below, I have my 6x6 paper pads, sorted by manufacturer and my photos that are waiting to be scrapbooked.

Oh, and I came home one day to find this old book holder/display on my front porch. 
My husband had found it in their barn and brought it home for Sage to use for her books.
She said she didn't want it, so I claimed it for my space.
I'm using it to store embellishments.


Here are some close-ups of my shelves.


I was super excited to get all of my Bazzill 12x12 cardstock organized by colour!


Oh, and before you go, a purge means that I have some stamps & dies to get rid of.

The prices listed below include shipping to Canada or the US.
I'm willing to ship internationally, but you'll have to pay for the shipping.
If you're interested in anything, please email me at pennercl@mymts.net.
Thanks!

Papertrey Ink
Headline Alphabet stamp set $18
Background Basics: Woodgrain $12 SOLD
Turning a New Leaf stamp set & coordinating dies $28
Holiday Photo Finishers stamp set (without the round sending Christmas Cheer
& rectangle Memory No. images) & coordinating dies $24
Scrambled Eggs stamp set & coordinating dies (egg, ears & basket) $15 SOLD
Simple Sentiments stamp set -- partial set includes: on your wedding day,
love you, happy anniversary, you're invited, just for you, welcome baby $6

Wplus9 Design
Label Layers 4 stamp set & coordinating dies $14
Pretty Peonies stamp set & coordinating dies $24 SOLD

Mama Elephant
Four Seasons $12 SOLD

Close to my Heart 
Poster Tidings $15

Thanks for looking! 

Sunday, January 25, 2015

Papertrey Ink January Blog Hop


Well, it's the 25th of the month, which means it's time for the Papertrey Ink Blog Hop.
The challenge is hearts.


I absolutely love the collage of photos Nichole chose!
So I decided to make my cards, based on the photos she picked.
Nichole also challenged us to make them for the people who are dearest to us in the world.
I've made my cards for my three children. :)


First up, my Valentine's card for my oldest son, Austin.
I was inspired by the top left hand photo -- Austin's favourite colour is orange.
Here's my card:


I stamped the sentiment (from Monthly Moments: February) in versa mark and heat
embossed it in white on orange zest card stock.
Then, I inked up my craft mat with some scarlet jewel ink and sprayed it with water.
Using a paint brush, I painted the heart, free hand. 
Then, I repeated this process with some raspberry fizz ink, trying to just ink in certain areas of the heart.
When it was dry, I ran the panel through my diecutting machine with my PTI woodgrain IP.

Next, I was inspired by the photo in the first column, second from the bottom.
I love the layered filmy hearts!
I decided to use my new Masterpiece kit to make my card for Sage...


I stamped the solid heart from the kit's stamp set repeatedly on my stamper's select white background,
in melon berry, sweet blush, hibiscus burst, raspberry fizz and pure poppy.
Then, I cut a piece of vellum and heat embossed my sentiment on it in white (MM:February).
I sewed it onto my white panel and filled it with some sequins (Pretty Pink Posh's Raspberry, Pink Blush, Pink Peonies, Watermelon).


I love the way the hearts look under the vellum panel!

For my next card, I was inspired by the pencil crayons in the bottom left-hand column.
Since, Jonah has taken up drawing, I decided to use my new Masterpiece kit for his card.


On a panel of stamper's select white, I stamped the frame in versa mark and heat embossed it in white.
Then, I inked it with my Tim Holtz blending tool in pure poppy,
orange zest, summer sunrise, limeade ice & simply chartreuse.
I stamped the sentiments & diecut the frame.
I added some enamel dots to the front and added a few diecut paintbrushes.


To add some authenticity to my paint brushes, I heat embossed the coloured part in clear, so they shine a little, like they're wet.

Well, that's it for me today.
I hope you enjoy the rest of the hop -- the PTI blog hops are always so inspiring!

Thanks for looking!


Friday, January 23, 2015

A couple of Patchwork Quilt cards

A friend of mine asked me to make a patchwork Quilt sympathy card for her recently.

Here's what I came up with....


I stamped my sentiment (from Reverse Confetti's Lots to Say) and then impressed it
with my PTI Woodgrain impression plate.
I diecut my scalloped square using PTI's LL:Squares 2.25" dies.
I used some Simple Stories Sweater Weather patterned paper and diecut them
using the straight edge Stitched Border 2 die from Pretty Pink Posh.
I adhered them to my card and added a vellum Lovely Layers die-cut & 
a decorative brad to finish it off.

I had some scraps left over, so I decided to make a second card.


This time, I used PTI's KIS: Birthday stamp set for my sentiment.

Thanks for looking!

Thursday, January 22, 2015

CAS(E) this Sketch #107


Today, I have a card to share that I made for
 CAS(E) This Sketch #107 by N@ Ali:


For my card, I decided to to some inking on my background.


After stamping my SSS sentiment in versa mark and heat embossing it in white,
I started with tropical teal at the top and continued with hawaiian shores and aqua mist as I went
further down my panel.
I diecut three Papertrey Ink clouds. 
I had planned on just adhering the clouds, but they didn't want to adhere nicely to the inked panel,
so I ended up diecutting a large one from the inked panel, removing it and inlaying a white one in its place.

Visit CAS(E) this Sketch to see the rest of the DT's takes on the sketch 
and to play along, if you'd like.
You have until Thursday, January 29th to link up your card.

Thanks for looking!

Tuesday, January 20, 2015

You're first class

Today, I have a quick card to share that I made using some Webster's Pages
patterned paper and some PTI stamps.


I trimmed my patterned paper and adhered it to my card.
I diecut a tag and stamped the sentiments from Get Lost.
I stamped the loopy arrow onto my patterned paper and the plane onto another piece
of card stock, which I fussy cut out by hand and adhered with some dimensional adhesive.
Both of these stamps are from PTI's Destinations.

Thanks for looking!

Monday, January 19, 2015

A Valentine's Card

Today I have a Valentine's card to share...


I started off by creating a stencil using my PTI Hearts Cover Plate and 
using that to apply some embossing paste.
I die-cut my tag & banner using Reverse Confetti's Tag Me Confetti Cuts.
I stamped my sentiment (from Reverse Confetti's Lots to Say, tucked in a few vellum 
hearts (diecut from the PTI Heart Cover Plate) and added a few 

Thanks for looking!

Sunday, January 18, 2015

The Card Concept #26

Today, I have a card to share for the Card Concept Challenge #26 (Happy One Anniversary!):


I thought that the inspiration photo was so gorgeous that I had to play along!
I was inspired by the flowers and ribbon.
While my style is usually Clean & Layered, 
I think that today's card falls into the Clean & Simple category.


I stamped my Wplus9 Pretty Peonies onto some stamper's select white card-stock.
Then, I cut my panel apart and removed a strip that was 3/16".
I stamped my sentiment (Reverse Confetti's Lots to Say) both on the white panel 
and on the sweet blush panel underneath.
I adhered the white panels to the sweet blush panel using dimensional adhesive.

Thanks for looking!

Saturday, January 17, 2015

Baby, it's cold outside

Just popping in today with a fun winter card that I made using 

I started with some snowflake patterned paper from the Jolly Good 6x6 paper pad & the two sweet little penguins at the top of the Tis the Season 12x12 patterned paper.


Here's my card:


I made a frame for my penguins by die-cutting a square from some white card stock 
and then trimming out the negative part into a rectangle.
I layered this over my trimmed out penguins and adhered it to the snowflake patterned paper, 
which I adhered to my white card stock card base.
I added a banner which I die-cut from the Making Spirits Bright patterned paper 
and stamped my sentiment from the Mini Illustrated Clear Stamps.
To finish it off, I added a die-cut snowflake which is held in place with a Mini-Brad.


Thanks for looking!
Friday, January 16, 2015

Cure for the Monday Blues #39

Today, I have a card to share that I made for the Cure for the Monday Blues Challenge #39:


Isn't that photo gorgeous?
The leaves on the dark plate reminded me of the leaves in the new Love Blooms stamp set,
so I pulled out my Reverse Confetti to make my card.


I debated on stamping my background with the new tiny circle stamps in Right Here, Right Now,
but then I remembered the Simon Says Stamp stencil I have and decided to use that.
I placed it over my stamper's select white panel and inked it up with Versamark,
then I heat embossed it in gold.
Then, I repeated the process with another part of the stencil and silver embossing powder.
I diecut the scalloped circle from smokey shadow cardstock using the Circles 'n Scallops Confetti Cuts.
I stamped my sentiment (using Beautiful Banners for "happy birthday" and All About You for "to you") and heat embossed them in gold.
I stamped the leaves from Love Blooms and heat embossed those as well.
A sprinkling of Pretty Pink Posh Metallic Gold sequins finishes it off.


Thanks for looking!