Pages

Sunday, June 30, 2013

Exciting news & my new space

I'm super excited to be able to share some wonderful news..... I was chosen to be a member of the Fresh Squeezed Stamps Design Team!


They've announced the new team on the Fresh Squeezed Stamps blog, so click over there to see the amazingly talented women that I'll be joining on the team. And  make sure you check back here on my blog on Fridays-- that'll be my day to post my Fresh Squeezed Stamps projects. :)

I also wanted to share some photos of my new craft area, which I got all put together yesterday afternoon.

My craft area is in a corner of our basement. Here's the before photo.


It was fine. I really liked sitting out with my back to the wall and facing the room. However, I didn't like having to walk around to the other side to grab supplies. I also found I used the whole table, which didn't leave a lot of room for Sage to join me.

So, here's the after...


We painted the back wall walls Serendipity-- it's fabulous-- it's just like PTI's Aqua Mist! We bought two Expedit cabinets at IKEA on Friday and Sage & Austin helped me put them together yesterday afternoon. And we added another table, that will be Sage's (or any friend who wants to join me!) space.

Here are some detail photos:


And that's it. :)

I'm so glad that I got this done just at the beginning of summer! I'm looking forward to cooling off in my basement and making layouts and cards (& am super happy to be using some new Fresh Squeezed Stamps to do so!)

Thanks for looking!


Friday, June 28, 2013

Five for Friday


It's been a while since I did a "Five for Friday post"...

1. As per our tradition, we made some butter crunch to give to the teachers at the end of the school year. Here are the tags that I made for Austin's & Jonah's teachers, using my Tag Sale #5 die and my new Live Love Life set from Papertrey Ink. These were so quick and easy!


2. Sage wanted to make her own tags for her teachers. She used stamps from PTI's Happy Trails. These first two are for her female teachers. The one on the left is for her music teacher and the one on the right is for her English, Science & Social Studies teacher, which she stamped with WPlus9's Fresh Cut Florals.


These next two are for her male teachers (one teaches her French & Math and the other is her Phys. Ed. teacher.)


3. We were actually on the ball enough to get all of these ready to give to their teacher's yesterday, so today would be as stress-free as possible, because today is...........our last day of school! Woohoo! My last day of work was yesterday, but the kids have to go for an hour this morning to pick up report cards and attend an assembly. They're having a farewell for the grade 8s, so I'll go to watch that for Austin (I cannot believe he will be starting high school next fall!) After that, we're heading into the city to take my mom out for lunch for her birthday.

4. After lunch, we'll do some shopping, which will include a trip to IKEA, where I'm going to pick up this and this for my craft room. :) I've taken down the one wall shelf I had and painted two of the walls this colour-- it's fabulous-- it's just like PTI's Aqua Mist (thanks again, Susan!) I did the first coat on Wednesday evening and was going to do a second coat before bed, but it was still a little tacky. So, I decided to get up early yesterday to do the second coat before work. As I was going down the hall, my husband came up the stairs with my paint tray. I asked him what he was doing and he said: "It's done." He'd painted the second coat for me! :)

I promise I will post some pictures as soon as my shelves are assembled and everything is in order. :)


5. And as a bit of a teaser, I have some exciting news coming up..... you'll have to come back and check my blog the first few days next week..... :)

Have a great weekend!

Thanks for looking!

Tuesday, June 25, 2013

PTI June Blog Hop


Once again, I'm participating in the monthly PTI Blog Hop. Here's this month's challenge...


I was quite excited about this challenge because I'm really liking gold lately. (When I went for a pedicure a couple of weekends ago, I asked for gold polish on my toenails. Love!)

So, I have a few projects to share and I thought I'd also share the inspiration behind each card today, too.

My first card was made using one of my very favourite sets: The Sweet Life. I was inspired to use gold on these blooms after seeing this card by Taheerah Atchia. I decided to yellow tones on my blooms and add the gold embossing powder on the third layer of the blooms. I stamped my leaves in limeade ice and new leaf and added some extra dots of gold, using some circle stamps from Rosie Posie. I used my simple stripes impression plate on the background, after stamping the dots and the sentiment (from Beautiful Butterflies) in new leaf. I mounted the whole card on some gold shimmer cardstock.


I was inspired by a piece of clothing for my next card. I was shopping with my friend for a dress for grad (her son is graduating this week) and saw a blouse that was so pretty. It was Sweet Blush in colour and covered with tiny gold polka dots. So, I decided to add some gold embossing powder to some sheer blush cardstock. I chose to use my BB:Woodgrain set for the background. I added some limitless layers: ovals diecuts (gold shimmer and stamper's select white). I stamped the sentiment from Happy Trails in sweet blush and added some buttons and twine to finish it off.


And these last two projects were both inspired by this first card by the oh, so talented Melissa Phillips. I love how she combined the white and gold embossing powders on her card.

Since I didn't have the Star Gazers set she used, I tried this technique first on my Lace Bouquet stamp set. I stamped the image in Versamark and then added some white and gold embossing powder. I added some strips of patterned paper (MME and Teresa Collins) that I diecut with my PTI Get a Handle On It die. The sentiment is from PTI's Beautiful Butterflies. I mounted it all on kraft cardstock and then added some decorative brads (MME and Teresa Collins) and stitching to finish it off.


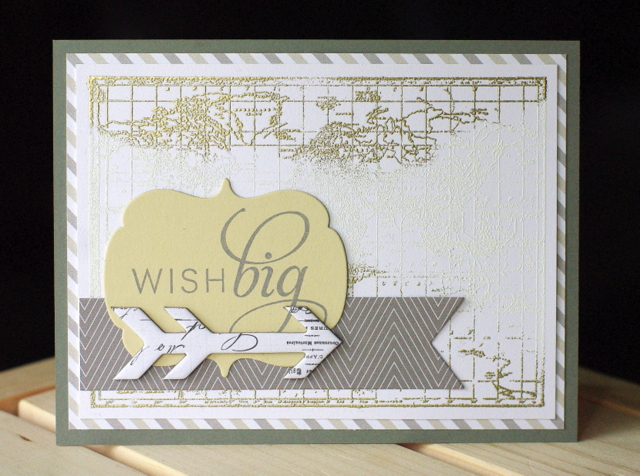
And I decided to try this technique again, using my PTI World Map Stamp. I really like how this one turned out!

I layered the stamped embossed map over some Teresa Collins patterned paper and smokey shadow cardstock. I added another Get a Handle On It diecut banner (more Teresa Collins patterned paper), a Pink Paislee chipboard arrow and a Happy Day diecut on which I stamped a sentiment from Stylish Sentiments: Birthday.


Thanks for looking!

Sunday, June 23, 2013

10 Minute Craft Dash #20


I thought I'd take a few minutes this weekend and play along with the 10 Minute Craft Dash #20, which was to use the above colour combo on a card. 

When I saw it, it immediately made me think of the MME The Sweetest Thing Honey line from last summer. I found a scrap of this paper in my stash and started making my card....

.... and let me tell you, I thought for sure I'd be done before 6 minute! I thought, oh yeah, this is going to be my fastest card ever!

But then, the label I'd stamped out didn't fit the way I wanted it to and I ended up recutting my background patterned paper and restamping on a Happy Day die cut... and here's what I ended up with...


And my time....


Not quite the 6 minutes I thought it would be.... but hey, at least I finished it before 10 minutes!

Thanks for looking!

Thursday, June 20, 2013

Playing with some new goodies


So, I placed my first order with WPlus9 designs a couple of weeks ago and ordered this adorable floral set called Fresh Cut Floral (stamps and dies). I finally got them yesterday, and since I didn't have to work today, I played with them in my craft room this afternoon.

I decided to play along with the current Monday Mood Board at Wplus9. (I've seen online friends playing along with this... and now that I have a Wplus9 set of my own, I can join in on the fun!)

Here's the Monday Mood Board:


I love the yellows, pinks and greens! Here's the card I made:


To start, I layered some Crate Paper woodgrain paper (I'm down to my last sheet of this again-- after I bought out the last sheets of it from my LSS!) over some Papertrey Ink Vintage Cream Cardstock. I diecut my Lawn Fawn Summertime Charm canning jar from vellum and stamped on it with versamark ink and heat embossed it with clear embossing powder. For the label, I masked off the "handmade by" label from PTI's Knit Bits stamp set and stamped it on some vintage cream cardstock. Then I stamped the sentiment from the WPlus9 set.

For the flowers, I diecut two the dies twice from the vintage cream cardstock and then just had fun stamping them all out. Then I played around with arranging them on top of the jar. (I've decided that I totally prefer paper flower arranging to the real thing!)

Here's a close-up:


Thanks for looking!


Tuesday, June 18, 2013

Create: Sketches -- Sketch #3

Well, I had the day off today, so I decided to work on a card and a layout for Sketch #3 from Create: Sketches.

Here's the sketch:


And I'll start with the card, since I made it first. I used all Papertrey Ink products. I diecut and stamped the largest Friends Til The End bloom & the leaves with Versamark onto vellum cardstock and then heat embossed it with white embossing powder. Then I took ink and Q-tips and coloured in the images, for this week's Make It Monday at Papertrey Ink: Coloured Vellum Flowers. I layered these onto some white cardstock that I impressed with my hexagon cover plate and inked with my Tim Holtz blending tool. I added a sentiment from Boutique Borders: Birthday, stamped onto a die cut double ended banner. I added some buttons and twine to finish it off (& to cover a bit of extra embossing powder. ;)  )


(Sorry for the blurry sentiment-- it looks much better in real life!)

And here's my layout, which I made using Fancy Pants patterned paper, diecuts and stickers.


For my title, I used the hello banner and added it to a wooden skewer to make a flag. I also added another banner that I cut with my PTI Get A Handle On It banner and my Modern Uppercase Alphabet dies. The skewer was quite thick, so I doubled-up my dimensional adhesive on the houndstooth patterned paper below it.


I was going to add the PTI Pedal Pusher bike, but it was bigger than mine in the photo, so I decided to use this Flair instead, along with a Fancy Pants sticker.


And I added two stickers to a round sticker on the sheet that said Happy Day.  And here's a close up of my journaling.


Thanks for looking!

Sunday, June 16, 2013

Some quick layouts

I love scrapbooking one or two photos per layout. This is definitely my favourite number of photos. However, sometimes I'll want to scrapbook events that have many photos that I want to include. When this happens, what I like to do is create some photo collages in Picasa and then print out my photos as an 8x10. I find this a very quick way to scrapbook, since the grouping of the photos has already been figured out.

Also, when scrapbooking so many photos in one layout, then I like to keep the rest of the layout fairly simple, so as not to overwhelm my photos.

Here are several examples of layouts that I scrapbooked this week using photo collages...

For my first layout, I chose nine photos from our recent taekwondo tournament to make the collage. Picasa has the option of including lines between the photos, so I did this, and then I just matted the whole photo on a piece of white cardstock.


I used Echo Park patterned paper (parquet & journaling card), Fancy Pants patterned paper (blue) and a Papertrey Ink stamp (from Shutterbug Special-- it's in the upper right hand corner of the bottom right hand photo) and my PTI Headline Alphabet & Number dies for the title.

For my next layout, I had my photo printed out as a 8x12" collage. I layered it over some Studio Calico patterned paper, which had that great stripe along the bottom already, so I just trimmed 1/2" off the top of the paper.


I cut a snowbank by hand and adhered it to my layout and sewed it in place. I stamped three little sledders from PTI's In the Meadow stamp set, in three colours that featured prominent in my photo. I overlapped them a bit, for this week's Make It Monday at Papertrey Ink: Overlapping Ombre.

For the title, I diecut the letters from Winter Wisteria and stamped them with the coordinating Headline Alphabets stamp. Sage chose the title. :)


I bought some new typewriter ribbon for my Royal Typewriter, and used it to type out my journaling, which I layered over the photo.

I'm linking up this layout for this week's Simon Says Stamp Challenge: Transport. A sled can be a form of transportation, right? ;)


Since I was scrapbooking my kids' cousins visit when my FIL passed away, I decided to scrapbook the other collage that I made of those photos right away, too.


I used some Bazzill and American Crafts cardstock and some My Mind's Eye patterned paper. I used my Headline Alphabet dies (again!) in the same cardstock as the border (I just cut a piece from the middle of the layout, where the white hides the hole).

The journaling card is an old one by Pink Paislee. It had some wheat in the bottom right hand corner, which I covered with the camera (this is a AC Dear Lizzy stamp that I stamped and cut out by hand.)

I also stamped the sentiment (from Shutterbug Special) three times (in black, dark grey and then the stamped off dark grey) for this week's Make It Monday at Papertrey Ink: Overlapping Ombre.


And lastly, I made a layout using two 8x10" photo collages, using photos that I took last summer on our trip to Vancouver Island. I placed these side by side on the left hand side of my layout and then trimmed the second photo in two and adhered the rest to the right hand side.


I used Bazzill kraft cardstock, Crate Paper patterned paper (the cream woodgrain that runs across both pages) and Simple Stories patterned paper (it's their latest travel line.) I trimmed the banners on the left hand side by hand, to match the banners that were printed on the right hand side patterned paper.

I also stamped the ticket stamp from PTI's Destinations stamp set three times, again for this week's Make It Monday at Papertrey Ink: Overlapping Ombre. I layered my title (again, cut with my Headline Alphabets dies cuts) over top.


And here's a close-up of my journaling, along with the Simple Stories decorative brad and diecut I added.


So, I'm pretty pleased that I got all of these layouts made this week. I have a few more 8x10s from our trip last summer, so I might work on these tomorrow, since the coordinating patterned paper is still on my table.

Thanks for looking!

Saturday, June 15, 2013

Golf Lesson

Today I have a sketch and layout to share for Pages With Papertrey.

This month, I chose this sketch from the June 2013 Page Maps:


And here's my layout... I used AC cardstock and Crate Paper patterned paper (woodgrain, herringbone) and Basic Grey (lines.) I stuck fairly closely to the sketch, but used some larger photos (these are 5.5x4").


I used my PTI Headline Alphabet dies to diecut my title from the woodgrain patterned paper that I used as my background mat. I used Edgers#5 to diecut my tab along the top, which I stamped with a stamp from Fabulous Frames. I also added a Freckled Fawn wooden word, because I love the photos of my brothers watching Austin so intently. I used my PTI pinking border die to diecut the strip of patterned paper that runs below my title.


I hand wrote my journaling. Under that, though, I stamped a star from PTI's Star Prints three times in Summer Sunrise, Harvest Gold and Lemon Tart and overlapped them for this week's Make It Monday at Papertrey Ink: Overlapping Ombre.


If you create a layout using this sketch, please link it here in the comments on my blog or here on the Papertrey Ink forum so I can check it out.

Thanks for looking!

Thursday, June 13, 2013

Overlapping ombre


I have two projects to share today for this week's Make It Monday at Papertrey Ink: Overlapping Ombre.
The first is a layout that I made for Austin's junior black belt test, 1.5 years ago. I had to laugh in looking at these photos because of how little Austin looks here. He's now taller than me!


I made a collage in Picasa and had my photo printed out as an 8x10, which made this layout quick to come together. I used some Pink Paislee patterned paper as my background paper and diecut my letters from true black cardstock using my Headline Alphabet dies from PTI.

In the top right hand corner, I added a few banners (cut using my double-ended banner and get a handle on it banner dies). On one of the banners, I stamped my overlapping ombre star (from Framed Out #1) with aqua mist, ocean tides and black ink.


While I had the Pink Paislee patterned paper out on my desk, I decided to piece one of the sheets together to make a card. I mounted it on a sheet of Fancy Pants patterned paper. I added a couple of banners (cut using the same banners as on my layout). I stamped the "congrats to" from All About You in Dark Chocolate ink. On the pure poppy cardstock banner, I stamped an image from Mama Elephant's On Target set.


For the MIM challenge, I stamped the "You" from PTI's Simply You stamp set in Fine Linen, Classic Kraft & Dark Chocolate ink.

Thanks for looking!

Wednesday, June 12, 2013

Just Golden


Today, I want to share a card that I made using my new Clearly Besotted Fancy Feathers stamp set. I'm linking this up for the Clearly Besotted Challenge #1: Anything Goes.

I used some Papertrey Ink cardstock and Crate Paper patterned paper (The Pier, again). I stamped a sentiment from PTI's Happy Trails on my patterned paper strip. I stamped the solid feather stamp in yellow and then topped it with the lined feather stamp in versamark, which I heat embossed it with gold embossing powder. I cut it out by hand and adhered it to my card using dimensional adhesive.


I added some PTI buttons and twine. To finish it off, I stamped some small circles (from Rosie Posie and Text Boxed) in different colours of ink and heat embossed three of them with gold embossing powder.

Thanks for looking!