Wednesday, January 08, 2014

Reverse Confetti January New Release Blog Hop


It’s a new year, and what could be better than to start it off with 
a brand new shiny release from Reverse Confetti?!  

Love is definitely in the air with the 6 new stamp sets 
(including our new Quirky Cuties line) and 3 new Confetti Cuts Dies!
  
We invite you to hop along with the Confetti Crew, Challenge Crew, 
and a few other friends today as we share our cards and projects using the new products.  
We think you’ll fall in love over and over with this release!


The hop started over on the Reverse Confetti blog, 
and you should have made it here from Debbie Olson's blog. 
It would be worth your while to start at the beginning of the hop, so you don’t miss a thing. 
We have tons of inspiration for you to see using all the new Reverse Confetti stamp sets!

I created my card for the hop using the January SFYTT:


I also used the new Crushin' stamp set and two new Confetti Cuts: Arrow & Love Note.
Here's my card:


I started with some Crate Paper, which I used to create my background, with a little stitching.
I die cut the Love Note scallop frame from the paper with which I used to mat the card.
I trimmed down a glassine bag to fit the inside of the frame and stamped my sentiment
from Crushin' in versa mark and heat embossed in aqua.
I sewed three of the sides of the bag to the frame die cut and then filled it with 
Then I sewed up the fourth side.
After adhering it to my card, I added an arrow die cut 
(which I shortened by trimming off the end and 
adhering it over the remaining part of the die cut. 
I added a Crate flair button to hide the seam.


I hope you’ve enjoyed hopping with us today. 
Be sure and hop with us on the 8th of every month for more Reverse Confetti inspiration! 

Now it’s time to hop on over to Angelica Suarez's blog. 
If you get lost along the way, you can find the hop order and list of all the participating designers 
over on the Reverse Confetti blog.

A few things before you hop along though, just to keep you “in the know”…
The January Sketch For You To Try is open for you to play along.  Click here for a chance to win.  
AND, there will be a Colour Challenge introduced on January 16th and another way to win!

Celebrate the creative side of you!

Thanks for looking!

Tuesday, January 07, 2014

Reverse Confetti Release: CRUSHIN'

Welcome to Day 3 of the January Release for Reverse Confetti! 


Today we are sharing a set called Crushin'.  
You can see the product graphics at the bottom of my post.  

Here are the cards I made with this set...

First up is the card I made using a technique I've been wanting to try for a while now.


I stamped a sentiment from Crushin' on the card stock background.
Then I die cut the Confetti Cuts: Arrow, stamped the sentiment on it and layered it over the sentiment with some dimensional adhesive.
I die cut the little rows of hearts using one of the dies from Confetti Cuts: Love Note.
Some stitching and enamel dots finish it off.

On my next card, I tried another new technique...


I used the Confetti Cuts: Arrow and die cut it several times from a piece of card stock.
Then, I layered it over another sheet of card stock and used is like a stencil with some 
embossing paste.
I layered this over a piece of Crate Paper patterned paper.
From the same patterned paper, I die cut the banner using them smaller tag 
I heat embossed the sentiment with some sea foam embossing powder.


That's it for today!
There will be a $15 gift certificate up for grabs, so you make sure you leave a comment 
on each sneak peek post for each designer to increase your chances of winning!
Comments will close at noon CST on January 7th and the winner will be 
announced at 5pm on January 7th.

Want another chance to win? 
Head on over to Reverse Confetti's Facebook page and 
look for the pink circle graphic posted there.

Thanks for looking!

Monday, January 06, 2014

Winners, winners, chicken dinners!

*Note: this is my second post for today.
Please scroll down to see my post for Day 2 of the Reverse Confetti January Release 
(& for your chance to win a $15 from Reverse Confetti)


Just popping in quickly to thank everyone for all the lovely comments they left on my giveaway post!
This was so fun & I will definitely be participating in this hop next year!

And, also, to announce the winners....

I had Sage choose two numbers between 1 and 284 and she picked 28 & 100.

So that means that
  Lynn of The Mango Boys and Me & Yvonne Morentin of The Adventure of the Creative Mind
are my two winners!

I've contacted you both.
If you could get back to me soon with your mailing addresses,
that would be great!

Thanks for looking!

Reverse Confetti Release: KEY WORDS: GO TOGETHER & KEY WORDS: SWEET THING

Welcome to Day 2 of the January Release for Reverse Confetti! 


Today, we are sharing projects made with two fabulous new sentiment sets:
Key Words: Go Together & Key Words: Sweet Thing.

Here are two cards that I made with Key Words: Go Together.


For this card, I used some Pink Paislee patterned paper as my background.
I also diecut a piece of it with one of the new dies that Reverse Confetti is releasing this month: 
Confetti Cuts: Love Note.
I die cut some aqua mist card stock using the scalloped die from Love Note
and stamped my sentiments on it in versa mark, heat embossing them in yellow and white.
A little stitching with my sewing machine finishes it off.

For my next card, I couldn't resist pairing  Key Words: Go Together
with the Be A Barista stamp set that was released in November.


I die cut some black cardstock using my Tag Me dies 
(I just die cut the end of the die and trimmed off the sides with my paper trimmer.)
I stamped the cup & sentiments in versa mark 
and heat embossed them with white embossing powder. 
For my background, I repeatedly stamped my kraft card stock with one of the heart border dies from another new set that Reverse Confetti is releasing this month: Whole Lotta Hearts.
A couple of buttons with twine finished it off.

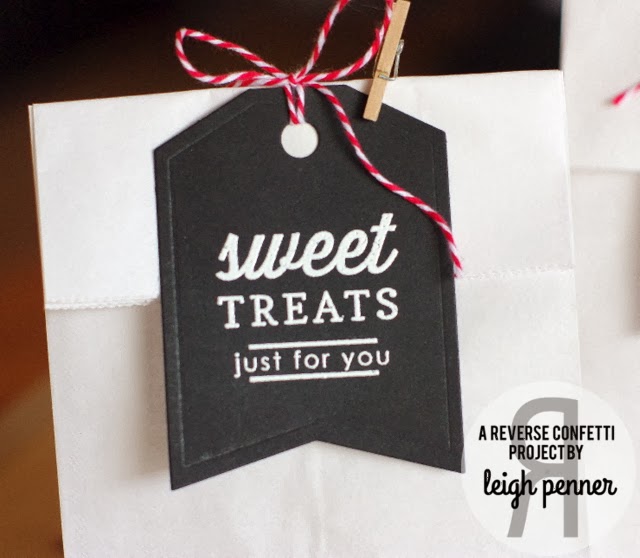
Since I was in an embossing/chalkboard mood, I decided to use the same technique to
make some treat bag tags using Key Words: Sweet Thing.


Both tags were cut using the largest tag die from Tag Me. 
I love how you can mix and match the sentiments from this set!


I also made a birthday card using Key Words: Sweet Thing.


Once again, I used the new Confetti Cuts: Love Note.
This time, I cut two of the scallop frames: one in sweet blush and the other in rustic white.
I used the impression marks on the white one and trimmed it down to fit in the pink frame.
I stamped three sentiments from Key Words: Sweet Thing in three different colours
to match my My Mind's Eye patterned paper background.
I tied some twine around the die cuts and added some buttons before adhering
it to my card with dimensional adhesive.


That's all for today!
There will be a $15 gift certificate up for grabs, so you need to leave a comment 
on each sneak peek post for each designer.
Comments will close at noon CST on January 7th and the winner will be 
announced at 5pm on January 7th.

Want another chance to win? 
Head on over to Reverse Confetti's Facebook page and 
look for the pink circle graphic posted there.

Thanks for looking!

Sunday, January 05, 2014

Reverse Confetti Release: QUIRKY CUTIES: FREIDA FOX & PAPER CRANE

Welcome to the January Release for Reverse Confetti! 
Jen has put together some fabulous sets this month......
featuring Valentines, friendship and lots of lovely sentiments! 
There are also some fantastic new dies this month, too!


Today we are sharing two sets called Quirky Cuties: Frieda Fox & Paper Crane.  
You can see the product graphics at the bottom of my post.  

Here are the cards I made with these sets...

First up is the card I made with Quirky Cuties: Frieda Fox.


Since I wanted to use the friendship sentiment in the set, 
I decided to stamp Frieda twice, using some masking, & make two fox friends.
I am planning on giving this card to my BFF and had lots of fun paper-piecing "our" outfits
with Crate Paper's Pretty Party patterned paper.
The glasses are included in the set, so I added those to "my" fox. 
I framed them in a polaroid die cut so it looks like "we" were caught on film.

My next two cards use the Paper Crane stamp set.


I used some Basic Grey patterned paper on this card.
I die cut the banners using the largest tag die from Reverse Confetti's Tag Me dies.
I just ran the die cut through my die cutting machine, but didn't run it though over the top of the tag. 
Then, I used my paper trimmer to trim the edges.
I stamped both the image and sentiment in versa mark and heat embossed them in white.
A few sequins from Pretty Pink Posh finishes it off.

For my next card, I chose to use just a sentiment from Paper Crane.


I also used one of the new Confetti Cuts available this month: Double Edge Scallop Border.
I ran it through my die cutting machine with some Basic Grey patterned paper seven times
and then layered them on my card.

I stamped my sentiment in a matching blue ink.
I wanted to add an embellishment, so I die cut the smaller heart from Confetti Cuts: Love Note
five times and used these to make a flower.


I was quite pleased with how it turned out!


That's all for today!


There will be a $15 gift certificate up for grabs, so you'll want to leave a comment 
on each sneak peek post for each designer to increase your chances of winning.
Comments will close at noon CST on January 7th and the winner will be 
announced at 5pm on January 7th.

Want another chance to win? 
Head on over to Reverse Confetti's Facebook page and 
look for the pink circle graphic posted there.

Thanks for looking!

Friday, January 03, 2014

Great news X 2

I have two very exciting things to share today....

First up....


I was thrilled to be asked by Paulina Nakamura of Pretty Pink Posh to join her design team!
I've loved being on Paulina's 10 Minute Craft Dash DT for the past six months.
While I was saddened by the fact that she won't be continuing with the Craft Dash Challenges,
I was happy when she asked me to be on the DT for her shop!
She's awesome and I'm super glad to be able to keep working with her!

Here are the rest of the PPP designers:


Paulina has the sweetest embellishments in her shop, including this fabulous kit,
some of which I used on today's card.


Here's my card:


I was inspired by the card that Ashley made for this week's Make It Monday.
I loved how she added the sequins to her tree, so I decided to create a card using the same technique.
(Note: I also used her Angled Backgrounds technique,
so I'm linking this card up to this week's Make It Monday.)
I used PTI's Mighty Oak cover plate to die cut my tree, with some SSS woodgrain card stock.
The sentiment is from PTI's Happy Trails.
The patterned paper is Fancy Pants' Beloved.
And, like I said before, the sequins are from Pretty Pink Posh. :)

I'm also super excited & honoured to be asked to be a
Featured Artist/Designer on the Paper Crafter's Library!
Here's a peek of the card that I have featured there today...

  
Please hop on over to the Paper Crafter's Library to check out my post.

Thanks for looking!

Thursday, January 02, 2014

Merry & Bright


*Hi there! If you're looking for my Season's Giving Blog Hop post, 
please scroll down.


Happy New Year!
Today, I have a layout to share that I made using
some Reverse Confetti stamps & dies. 


I used some Teresa Collins patterned paper for the background 
and some Pink Paislee patterned paper and chipboard words/images.


I diecut a Papertrey Ink tree using my In the Meadow dies and stamped on it in versmark
using my Reverse Confetti's Tinsel 'N Trim stamp set, which I heat embossed in white.

I used the same technique for my "Merry" in my title, 
using my Reverse Confetti Bring On the Merry stamp set.
This I trimmed out by hand and adhered to my layout using dimensional adhesive.


I also used the banner from the Tag Me dies and layered it under the "believe" chipboard banner.

Note: I'm using this layout for the January Pages With Papertrey Challenge, 
which is to stamp on a die cut without using a coordinating stamp.  
So if I am using a In the Meadow die cut (like I did in my layout), 
I can't use a In the Meadow stamp on it. Make sense?


Thanks for looking!