Wednesday, November 20, 2013

Three Cards

Hi there!
I have three cards to share today.


The first card is my first attempt at the 10 Minute Craft Dash Challenge #30 ,
which is to use the colours in the graphic above: pale yellow, magenta & navy.

I thought I'd use my new SSS speech Bubble die and one of my favourite stamp sets: Fresh Cut Florals. So I pulled these out, along with some coordinating patterned paper and got to work.
Here's the card I made....


And when I checked my time........... it was over 13 minutes!
Ack! Epic fail.

So, I tried again, this time with some Teresa Collins patterned paper, a MFT die and
my new City Scene stamp set from Papertrey Ink.
Here's what I made:


And my time: just under 10 minutes: 9:54.6.
Success!

So make sure you visit Paulina's blog to check out what the rest of the DT made for the challenge.
And you'll probably want to play along, too..... here's the prize that's up for grabs:


 But before you do that, I have one more card to share...

My friend, Erin, & I are doing a colour challenge this week.
We each chose three colour schemes and stamp sets and we both need to make cards using them. 
For today, I chose this colour combo and the Two Step Sprig stamp set from Waltzingmouse Stamps.


And here is my card:


 I had fun stamping the leaves from this set on my background (before impressing it with my PTI woodgrain IP) and again on my tag.

Make sure you check out Erin's blog to see her take on the challenge!

Thanks for looking!

Tuesday, November 19, 2013

E&L's Colour Challenge: Day 2

Hi there!
Welcome to Day 2 of the colour challenge I'm doing with my friend, Erin!
For today's challenge, she chose this colour combo and the Mighty Oak stamp set from Papertrey Ink.


I decided to CASE this card by Betsy Veldman, (something I've been wanting to do since she posted this card back in August!) but using the assigned colour scheme.
Since I was making a wedding card, I decided to add two birds instead of just one.


I die cut my WRMK patterned paper with the Mighty Oak cover plate.
Then, I die cut a sheet of plain white printer paper and layered it over my card stock background. 
I stamped my images over the paper and then removed my mask. 
I layered the die cut patterned paper overtop with dimensional adhesive.
I stamped my birds and fussy cut them out by hand.

Be sure to head on over to Erin's blog to check out her take on the challenge!

Thanks for looking!


Monday, November 18, 2013

E&L's Colour Challenge: Day 1

A few weeks ago, my friend, Erin Taylor, sent me an email and suggested that we do a challenge for a week together.
I thought this sounded like a lot of fun, so we brainstormed a little and we came up with the idea that we would each create a card using a stamp set that we both own and a colour scheme, which would change daily.

So, for day one, I chose this colour combo and the Trifecta stamp set from Mama Elephant.


Now, I have to admit that I totally struggle with this stamp set.
I started one card and didn't like it at all, so I tossed it.

Then, I decided that rather than stress myself out over this (it was suppose to be a fun challenge, after all!), I looked through my other stamp sets and chose to pair Trifecta with my new PTI City Scene stamp set.

Here's my card:


I stamped the background with a stamp from Trifecta.
I stamped the buildings and sentiment (from Reverse Confetti's Lots to Say)
and trimmed out the three sides with my trimmer. I fussy cut the top. 
I added some baker's twine and the orange button and adhered it to my card with dimensional adhesive.
Then I sewed on the other two buttons.

Hop on over to Erin's blog to check out her take on the challenge.

Thanks for looking!

Saturday, November 16, 2013

Reverse Confetti's November Colour Challenge

Today, I have a card to share that I made
for the Reverse Confetti's November Colour Challenge.


I made my card with Reverse Confetti's Forever Fall stamp set.


 I started with a panel of My Minds Eye patterned paper.
I layered it over some rustic white cardstock and added some stitching.
I diecut a tag from the same cardstock and stamped the woodgrain heart image & sentiment.
I added a blue button with some twine and tied a bow on my tag.
I adhered the tag to my card using dimensional adhesive.

If you'd like to play along with the Reverse Confetti Colour Challenge, 
hop on over to the Reverse Confetti Blog to get the details.


Thanks for looking!

Friday, November 15, 2013

Inspired Blueprints Sketch #110

Today, I have two layouts to share that I made using both sides of one sheet of patterned paper.
The first one was made for Inspired Blueprints Sketch #110:


And here's my layout:


I used some Prima patterned paper and American Crafts wooden letters.
I also used some Papertrey Ink Antique Alphabet stamps ("of a"), buttons and twine.


Here's a close-up of my journaling:


When I was finished my layout, I looked on the back of the Prima patterned paper I used to mat my layout and felt like it would be a great place to expound on what I'd talked about. So, I added a second black & white photo that was taken at the same time as the one on the front and added some journaling.


In addition to my handwritten journaling, I added some more AC letters for my title and a stamped heart (from Reverse Confetti's Forever Fall set) and a button and twine (both PTI).


I'm going to use this IB Sketch for this month's Pages With Papertrey Sketch Challenge. If you create a layout using this sketch, please link it here in the comments on my blog or here in the Papertrey Ink forum.

Thanks for looking!

Thursday, November 14, 2013

CAS(E) this Sketch #54

Today I'm sharing the card that I made for Sketch #54 by N@Ali:


Here's my card:


I diecut a vintage cream mat stack 5 and layered a Love Lives Here die over top. I used Simple Stories (the cream map) and Heidi Swapp patterned paper. The sentiment is from Wreath for All Seasons & the key is Graphic 45.

Visit CAS(E) this Sketch to see the rest of the DT's takes on the sketch and to play along, if you'd like. You have until Thursday, November 21st to link up your card.

Thanks for looking!


Wednesday, November 13, 2013

New goodies

Earlier this fall, Sage & I were invited to a Close to my Heart party.
I ended up purchasing a stamp set, a kit (because I really liked the stamp set in the kit) and getting a third stamp set for free, which is always fun. ;)

I decided to ink up my new goodies this week.
I made this card.


In addition to the CTMH stamps, I used some Crate & WRMK patterned paper, Simon Says Stamp woodgrain card stock & some MME brads.

And I also made this layout.


I used some MME patterned paper and decorative brads.
I also used the CTMH stamp set that I got for free.
I have to tell you that I tried stamping this subway style sentiment stamp so many times. At least seven. 
Finally, on my last attempt, I messed up on the "fall", but I just decided to restamp it on another piece of card stock, cut it out and adhere it over top. I was done!
I used my PTI Leaf Prints dies to die cut the patterned paper leaves and my silhouette portrait to cut out my title.

I'm linking up this layout to My Mind's Eye's November Challenge: Gratitude.

Thanks for looking!

Tuesday, November 12, 2013

A Pumpkin Party -- Part 2

Yesterday, I shared photos of the pumpkin party that I hosted for my Sunday School class.
Today, I just wanted to share the treat bags that I made for them to take home.


I used brown paper lunch bags.
I die cut some tags from rustic white card stock. 
On these, I stamped a little pumpkin onto each one. 


I diecut banners from kraft card stock.
I stamped on these with the woodgrain image and then overtop with the sentiment.

The images and sentiment are all from Reverse Confetti's Forever Fall stamp set.


Thanks for looking!

Monday, November 11, 2013

A Pumpkin Party -- Part 1

 On the last Saturday in October, I hosted a Pumpkin Party for my Sunday School class.
I have a group of 10 eight and nine years olds and
I thought it would be fun to have them over for a little party.

Sage and I had fun getting ready.

We changed up our chalk board for the party and added some little fake pumpkins for
decoration on the piano.
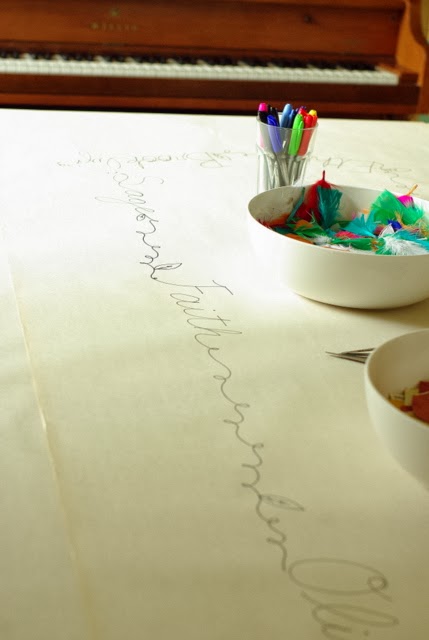
We also covered the table with paper and I wrote each child's name on it to mark their place.


It was Sage's idea to make a garland from leaves. 
We die cut these from patterned paper and my four leaf dies and I sewed them together.
We draped some of the garland over the chalkboard frame and 
the rest, we hung in our dining room window.


When the kids arrived, we had them hunt for the pumpkins we'd hidden in the house. 
Then, they got to decorate them, using feathers, felt, patterned paper and markers.

The end results were pretty adorable!


And the kids seemed pretty pleased with them, too.


After we were done with our craft, the kids played outside in the backyard, 
while I set up the food.


I had to use my beverage server, because, well, I just love it! 
I made a homemade iced-tea recipe and 
then Jonah and I combined a lemonade frozen concentrate 
with a berry frozen concentrate to make a second drink that was a huge hit!

I also served...


I was inspired by the cookies that Elena decorated 
and attempted to decorate mine in the same fashion.


I made up the little cards for the food by printing the names on card stock with my printer and then stamping some images from Reverse Confetti's Forever Fall stamp set.


Thanks for looking!

Saturday, November 09, 2013

Moxie Fab Thanks! Blog Hop


Today, I'm participating in a blog hop for Cath Edvalson.

Cath was the Trends Editor for Paper Crafts Magazine & creator of the Moxie Fab World Blog.
I very much enjoyed visiting her blog-- it was always jam-packed with inspiration and wonderful challenges. 

However, this week, Cath announced that she will no longer have a place on the editorial team for Paper Crafts magazine. And, as a result, she had written her last Moxie Fab World post.

A bunch of people in the paper crafting community wanted to express our thanks/appreciation/well wishes to Cath in the form of a blog hop

So, if you're following the hop, you've hopped over here from Penny Ward's blog.

I thought it would be fitting for me to create something for Cath based on something she'd posted on the Moxie Fab World. So, on Tuesday afternoon, I went to the MFW blog to scroll through it.... and I found inspiration with the last post Cath made.


I love this quote and was inspired by the alternating gold and blue lettering.


I did my own version of the alternating coloured sentiments by heat embossing them in aqua & gold.
I used Papertrey Ink's We Go Together ("For the Record", "awesome" & "just saying'") & strawberry sentiments ("sweet") and the ampersand is from Peace, Joy, Love. 
"You are simply wonderful" is from Mama Elephant's Smitten stamp set.
I stamped it all on a MFT mat and layered it all over some Pink Paislee patterned paper.
I added the two buttons (the gold one was embossed with gold embossing powder to coordinate.)

The next stop on the hop is Christina Maclaren's blog.
(But, if you're lost, the blog list is posted below.)

I'm also linking this up to this week's Simon Says Stamp Challenge: Keep It Clean & Simple.

Thanks for looking!