Showing posts with label Chickaniddy Crafts. Show all posts

Sunday, May 17, 2015

Inspired by Pinterest

Today, I have a card to share that I was inspired to make
after seeing this photo on Pinterest:


I love the beautiful pink blooms, which got me thinking about
the pretty shades of pink in the Chickaniddy Crafts Twirly Girly Collection.
So, I grabbed my PTI Mighty Oak coverplate, some Goldie Lox foil
and some Twirly Girly patterned paper and made this card:


I diecut the coverplate from white cardstock and removed all of the leaves and the trunk.
I adhered this to a folded piece of white cardstock that became my card base.
I diecut the Goldie Lox foil using the coverplate and inserted the trunk and some of the leaves 
into the empty spaces on my card.
I diecut the solid pink and berry leaves from the 12x12 Itty Bitty Ballerina patterned paper, and the patterned leaves from Piggy Tales, Birthday Girl and one sheet of the Twirly Girly 6x6 paper pad.

The Goldie Lox foil diecuts like a dream and looks fabulous on my card!


4For my banner, I diecut another piece of 12x12 Itty Bitty Ballerina patterned paper, using
PTI's Songbirds die and stamped on it twice using the sentiment from the Twirly Girly Clear Stamp set.
All I did was curve the sentiment slightly before stamping it.
I adhered it to my card, using regular adhesive, but placing a piece of foam adhesive near the trunk
to add a little dimension.

Thanks for looking!

Friday, May 15, 2015

Five for Friday

1. Our events from last Saturday went well:

Jonah & Sage did really well at their 2nd Poom belt test.
Normally, the people testing for black belts get called up a few
times during the test, but Jonah & Sage's group only got called up once.
Our instructor said that the masters must have seen all
they needed to see & felt that their group was well prepared.


Here are Sage & Jonah, along with Jonah's best friend, Josh.
They all train together and it was great to see them test (& pass) together, too!


Austin's party was a success.
He'd invited three friends over for pizza and then we went
to see Avengers Age of Ultron in the theatre, which was very good.


2. Last night, we went to see the Grade 5 musical: The Trial of the Big Bad Wolf.
It's was fabulous!
Sage had a great role -- she played Weasel Too, one of the Big Bad Wolf's attorneys.


Doesn't she look adorable?
Her character got to say lots of big words -- that's what drew Sage to the part!


And she also got to sing and dance!


She's been so excited about this part -- I've been getting updates every day
on the rehearsals, songs, dance numbers, etc, that I think she's disappointed that it's all over now.


3. An update in my healthy eating plan:
It's been over 4 weeks and so far, I've lost 6 pounds!
What has really helped me:  I got a new accountability partner.
After our shopping trip and a little frustration finding clothes that fit her well,
Sage decided that she too would cut out sugar, deep-fried foods and snacking after supper.
She has done so well! Together, we've lost 13 lbs.
and I can tell how much better she's feeling about herself!


4. I made a card for the last Curtain Call Inspiration Challenge: Travel On:


I was a little off on the dates (I thought I had another week before the deadline!),
so while I didn't post this in time for the challenge,
 I thought I'd share it anyway.


I inked up my PTI World Map stamp with spring rain, blueberry sky, 
limeade ice & simply chartreuse inks  and then spritzed it with water before stamping.


I love the watercolour effect the spritzing gives!

For my sentiment, I did the smooshing technique on some white cardstock
with some blueberry sky ink & diecut my SSS Sending die from it.
Then, I diecut it twice more and layered them together.

The "birthday wishes" was stamped in versamark onto a strip of simply chartreuse
cardstock and heat embossed in white (it's from PTI's KIS: Belated Birthday).


I stamped the postmark (from a Sweet & Sassy stamp set) in spring rain
and the camera (from PTI's Summer Camp) in limeade ice, which was stamped off first.


5. I have a card up on the Chickaniddy Crafts Blog today.
Here's a peek:


Click here to see it in full and to see which collection I used.

Thanks for looking!

Wednesday, April 15, 2015

Happy Day

Today, I have a card to share that I made using the pretty
flowers and leaves from the Chickaniddy Crafts Date Night Clear Stamps.


Here's my card:

Leigh Penner Happy Day @chickaniddycrafts @leigh148 #chickaniddycrafts #cards

I started by trimming some white cardstock to 4x5.25" and 
stamping my flowers in sweet blush,and berry sorbet inks.
I stamped the flowers onto some post-it notes, trimmed them out with some scissors and 
used them as masks to stamp the coral flower and the leaves.

Leigh Penner Happy Day @chickaniddycrafts @leigh148 #chickaniddycrafts #cards

I stamped the leaves near the bottom of my panel as well. 
I diecut a piece of the 12x12 Itty Bitty Ballerina patterned paper & the 
Mini Sticker Tag with PTI's Get a Handle on It banner die and adhered them to my card. 
I stamped two flowers onto another piece of white cardstock and trimmed them 
out by hand before adding them to my card.


Leigh Penner Happy Day @chickaniddycrafts @leigh148 #chickaniddycrafts #cards

I adhered my card to a piece of the 12x12 Itty Bitty Ballerina patterned paper 
that I trimmed to 4.25x5.5."

Thanks for looking!

Monday, April 13, 2015

On the Bazzill Basics & Chickaniddy Crafts Blogs today

Hey there!
Just popping in today to let you know that I have
this card up on the Bazzill Blog today.


Nice & bright, eh?
Click here to check out my step-by-step tutorial.

Oh, and before you go, I also have a card up on the Chickaniddy Crafts Blog today.
Here's a peek:


Click here to see which floral stamps I used on my card.

Thanks for looking!

Saturday, March 28, 2015

Some Chickaniddy Crafts Christmas Cards

Hi there!
I'm off to a taekwondo refereeing seminar this morning in Winnipeg.
(I'm also planning on doing a little shopping afterwards --
can't wait to check out all of the spring styles!)
 
I've been busy lately (work, watching my kids' choirs perform at various festivals, etc.),
so I haven't been spending as much time in my craft area as I would like.
(That should change this week though, as I have the whole week off since it's spring break!)
 
I was looking through my cards for something to share and came upon these four cards
that I made in December but for some reason never posted.
 
They're Christmas cards that I made using some
 
 
For this card, I used some Jolly Good patterned paper and an Illustration Sticker.
The sentiment is a Mama Elephant stamp.
I diecut the scalloped border using a Pretty Pink Posh Stitched Border 1 die.

 
This card using the same patterned paper as the first card, as well as a journaling card that

 
This card uses the same Illustration Sticker as the first card, as well as some patterned paper
Once again, the sentiment is stamped using a Mama Elephant stamp.

 
And lastly, I made this card, using an image that I trimmed from this piece of patterned paper,
along with a couple of pieces of patterned paper from the Jolly Good 6x6 paper pad.
I created the scalloped border using the same
Pretty Pink Posh Stitched Border 1 die as I did in the first card.
 
Thanks for looking!

Friday, March 13, 2015

Five for Friday

It's been a while since I posted a Five for Friday post....

1. I am loving that spring is starting to arrive!
We've had temperatures above zero this week and the snow is melting!
I'm thinking I'll probably be able to take out my bike on the weekend...


2. With spring's arrival, I've been daydreaming about spring clothes!
I've ordered two pairs of pants and can't wait to wear them....
I got these from Ricki's (click!) and these from Old Navy (click!).
I'm thinking they will both look great with navy tops (including this one that I got from Ricki's)
Now, I'm on the hunt for some cute navy flats....


                                           3.

Did you know that I have been a designer/educator for Paper Crafter's Library for
about a year now?
This means that I make about 6 or 7 videos a month for Paper Crafter's Library
and they post them on their site, along with PDFs with supplies, instructions, etc.
It's been such a great experience and I'm really enjoying it!
If you're interested in seeing the projects/videos I've made for PCL, click here.


4. I want to share a card that was posted earlier this week on the Chickniddy Crafts Blog
that I made using some Chickaniddy Crafts Scrumptious products.


I trimmed my Chickaniddy Crafts Scrumptious patterned paper to 4x5.25" and diecut a heart using 
the largest heart dies from Reverse Confetti's Heart to Heart Confetti Cuts from the patterned paper.
I diecut three more hearts from white cardstock.
 I adhered my patterned paper panel (sans heart) to a 4.25x5.5" panel of white cardstock, and stacked the three hearts and adhered them in the spot where the patterned paper heart was removed.
 I stamped the "love" from the Date Night Clear Stamps on the patterned paper heart
and adhered it over the cardstock hearts.
 I diecut my "sending" (from PTI's Wet Paint Cuts III) from black cardstock and adhered it to my card.

Here's a photo from the side, so you can see the dimension the stacked hearts add to the card. 


5. And, I also want to share a card that I made for The Card Concept #30: Thinking of You:


I love this gorgeous photo and just had to create a card for it!
My card style is Clean & Layered.

Here's my card:


I started by stamping the jar from Lawn Fawn's Summertime Charm stamp set
and heat embossing it in white.
I repeated this with the sentiment (from Wplus9's Fresh Cut Florals) and 
the swirls (from PTI's Hanging by a Thread stamp set).
I stamped the jar onto a post-it note and cut it out by hand, using it as a mask for my jar
while I applied some sweet blush ink to my background using a Tim Holtz blending tool.

I stamped my PTI Bitty Bouquet flowers both on the background and on the coordinating diecuts.
I cut a slit at the top of the jar and insert the stems into it.

Here's a close-up of the embossing on the jar.


Thanks for looking!

Monday, March 09, 2015

Chickaniddy Crafts: white space

Today, I have a card to share that I made using one of my favourite elements: white space.
I've always been a huge fan of white space on cards and scrapbooking layouts
 -- it allows the eye to rest and draws more attention to the elements on your project.

To make my card, I used some Chickaniddy Crafts Scrumptious products.

I paired a diecut from the Scrumptious Diecut Tags with some stickers from the Scrumptious Illustration Stickers.


Here's my card:

 I started with some white cardstock that I layered over a piece of Scrumptious Friends and Family patterned paper that I trimmed to 4.25x5.5".
 I cut a piece of Scrumptious Check Please patterned paper to 1x4" and adhered it to the top of the white cardstock and stitched it in place with a zig zag stitch.
 I diecut a banner from the back of the Scrumptious Check Please patterned paper (with PTI's Get a Handle on It) and layered it on my card with the diecut from the Scrumptious Diecut Tags 
(on this, I stamped the sentiment from Twirly Girly Clear Stamps.)
 The diecut I used already had a flower at the top, so I added a couple more from the Scrumptious Illustration Stickers.
I wanted to add a couple more leaves, so I used a leaf diecut from my collection (PTI's Turning a New Leaf) 
and diecut the green stalks from the corn stickers on the sheet -- this worked perfectly!

Here's a close-up:


How about you?
Do you like including white space on your cards?

Oh, and before you go, I have another card on the Chickaniddy Crafts blog today, 
if you'd like to check it out.

Here's a peek:


Click here to see more.

Thanks for looking!

Tuesday, March 03, 2015

On the Chickaniddy Crafts blog today

Hey there! 
I'm just popping in to let you know that I have a card on the Chickaniddy Crafts blog today,
if you'd like to check it out.

Here's a peek:


Click here to see more.

Thanks for looking!

Saturday, February 28, 2015

Hello Spring

Hi there! I'm popping in today with a card I made to welcome in spring!

Now, you might think of the Chickaniddy Crafts Scrumptious as a fabulous fall line --
which it is indeed -- but I found that these products were also perfect to make a "Hello Spring" card!
(Note: I know I'm being overly optimistic with making a "Spring" card in February --
especially when we probably won't see spring until the end of April (but a girl can dream, right?)

I started with the Scrumptious Journal Tag stickers, or more specifically, the "Hello" floral sticker near the bottom.


Here's my card:


I started by diecutting a piece of Check Please patterned paper with a scalloped rectangle die.

I adhered a piece of white card stock over top that I diecut using a stitched rectangle die.

 I wanted to use the "Hello" sticker from the Scrumptious Journal Tag stickers, but I also wanted to add the word "spring", so I trimmed out the sticker while it was still on the backing and cut it in half, like this:


 Once cut apart, I adhered the sticker to the white card stock panel.

 I made a banner by diecutting the New Harvest patterned paper into a long banner, trimming
down the top and bottom and adhering some Twirly Girly alphabet stickers.

Here's a close-up of the sticker once the card was done: 


Thanks for looking!

Tuesday, February 24, 2015

On the Chickaniddy Crafts blog today

Hey there! 
I'm just popping in to let you know that I have a card on the Chickaniddy Crafts blog today,
if you'd like to check it out.

Here's a peek:


Click here to see more.

Thanks for looking!

Wednesday, February 11, 2015

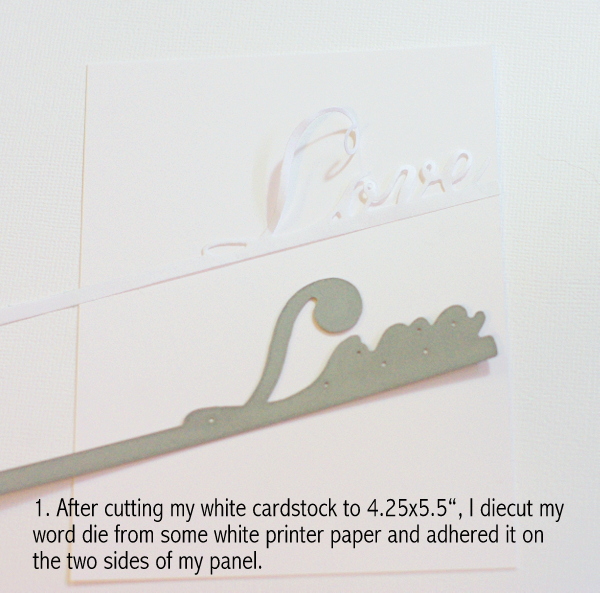
A Stitched Sentiment tutorial

Hi there! I'm here today with a card (& a tutorial!) to share that I made using 

I started with three pieces of Scrumptious patterned paper: Frolic in the Leaves, New Harvest & a floral pattern from the 6x6 paper pad.


Here's my card:


I decided to use a diecut word as a template for my stitching.
Here's what I did:


Here's a close up of the finished stitched sentiment.


After I was done stitching, I added some strips of Scrumptious patterned paper.
I diecut the floral paper from the 6x6 paper pad with a heart border die and adhered it to my card.
I trimmed the "grateful for you" banner by hand (it was on the back of the New Harvest patterned paper.

Oh, and before I go, I just wanted to let you know that 
I also have a card up on the Bazzill Basics Blog today.


Can you guess what die I used to create my puzzle piece?
Click here to find out.

Thanks for looking!

Monday, February 09, 2015

Papertrey Ink Anniversary Challenges: Day 3 & 4

Hi there!
I have a  couple of projects to share for the PTI anniversary celebrations.

First of all, Sage & I got crafty on Saturday and made 44 valentine treat bags for her teachers & classmates.
She's in a Grade 5/6 split French Immersion class, but joins with the other Grade 5 French Immersion class for an hour each day for social studies & science, so she wanted to make treat
bags for them, too.

We're linking these up for the Day 3: Bagged & Tagged Challenge.

It was definitely a team effort.
On Saturday afternoon, I trimmed cardstock strips to 4.25x2.25" and Sage scored the one end at 1".
I stamped the sentiments (from You're a Masterpiece) in Versafine and heat embossed them in clear.
Then, Sage & I used our Gelatos we bought with the You're a Masterpiece kit
to paint all of the tags.


Then, yesterday afternoon, after church, we put pieces of Butter Crunch in small white lunch bags, 
folded them over and stapled the tags to each bag.


Sage got the idea to splatter each tag with the gelato.
Here's one that she made:


Here's one that I made:


And here are two that we made for the boys.


And Sunday afternoon, I also played in my craft room and 
made a card for the Day 4: Build a Bouquet Challenge.
I actually don't have that many PTI floral sets, so I used the floral image from County Fair
and some images from Tinsel & Tags Sprigs stamp set.


I started by diecutting the Layered Banner dies from aqua mist cardstock and from
some aqua mist striped patterned paper.
I stamped the sentiment from the Layered Banner Banter stamp set.
I stamped the County Fair images on the white panel on my card as well as on a coordinating diecut.
I added a few Tinsel & Tags Sprigs that I stamped on coordinating diecuts.

And before you go, I just want to let you know
that I have a card on the Chickaniddy Crafts blog today, 
if you'd like to check it out.

Here's a peek:


If you'd like to see how I created this stitched sentiment by using a regular word die, 
please click here.

Thanks for looking!