Sunday, August 21, 2016

Curtain Call Inspiration Challenge -- Flamingo -- Take Two

 I have another card to share that I made using the current

I was really inspired by that adorable phone case displayed in the lower right-hand corner
and decided to recreate it for a journaling tag for my summer pocket album.

So I pulled out my Reverse Confetti Fabulous Flamingo 

Peacock Pretties and combined them to make my journaling card.


I started by diecutting some Bazzill cardstock with my Documented Confetti Cuts
journaling card die.
Then, I stamped the legs (using Fabulous Flamingo) onto the pink diecut in white.
Once that was dry, using my MISTI, I stamped it again in pink overtop.


I really liked the plumage in the inspiration photo, so I decided to try to copy
it by first diecutting my flaming and wing using Fabulous Flamingo Confetti Cuts.
Then, I diecut two paisley shapes using Perfectly Paisley Confetti Cuts
to adhere over top.
I stamped my sentiment using Peacock Pretties in versamark and heat
embossed it in white.


Remember, there's still time to play along with this
 Curtain Call Inspiration Challenge.

Thanks for looking!

Saturday, August 20, 2016

Bible Journaling -- Psalm 91:4

Today, I have a piece of Bible Journaling to share with you.
I was inspired by this post from Dawn McVey yesterday,
where she shares several beautiful examples of Bible Stamping.

When I first decided to Bible Journal, I liked the idea of doing
my own lettering in my Bible and spent time working on perfecting my lettering.
But, I found I just wasn't creating the pages that I'd hoped to in my Bible.
Part of me felt like I was a little stuck, part of me felt it needed to be perfect...
but Dawn's post helped remind me that it's perfectly okay to just stamp
in my Bible, and not feel like I have to do my own lettering. 
Just like I have different styles when I create cards,
I can have different pages in my journaling Bible.

So here's my page:


I used my Waltzingmouse Fine Feathers stamp set to stamp my verse
and feathers.


I just love this verse!
I came across it in my devotions this week as I was reading
Psalm 31 and was inspired to create a page for it.

Thanks for looking!
Friday, August 19, 2016

Papertrey Ink's August Create Along With Us

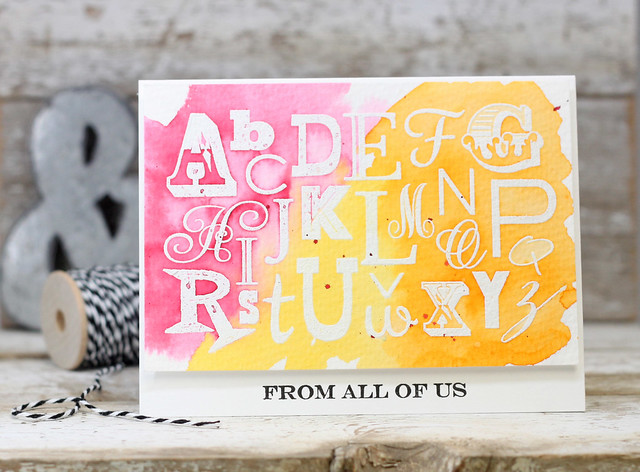
Today, I have a card to share for Papertrey Ink's August Create Along with Us,
where I was inspired by this card by the amazing Laurie Willison:


I love the watercolour wash that Laurie did over the embossed alphabet! 
I decided to create my card by heat embossing the leaves from Songbird
in white on my watercolour panel.


I coloured over them with my Zig Markers and some water and a paintbrush.
I trimmed out my panel and adhered it to a piece of white cardstock
using dimensional adhesive.


I stamped my sentiment (from Choose Joy) in 
versafine onyx black.

Thanks for looking!

Thursday, August 18, 2016

CAS(E) This Sketch #186

Today, I have a card to share that I made for
 CAS(E) This Sketch #186 designed by N@ Ali :


I decided to rotate the sketch 180˚ to make my card.


I started by stencilling & stamping on one of the pieces of patterned paper 
from the PTI Colour Pop Florals kit.
I added a piece of black cardstock over top.


I diecut two of the words (also from the Colour Pop Florals kit)
from white cardstock, stacked them together and adhered them to my card.
Visit CAS(E) this Sketch to see the rest of the DT's takes on the sketch 
and to play along, if you'd like.
You have until Thursday, August 25th to link up your card.

Thanks for looking!

Wednesday, August 17, 2016

Altenew August Inspiration Challenge -- Take 3 & Share Your Altenew Love Video Contest

Today, I have a card to share for the Altenew August Inspiration Challenge:


This is actually the third card I've made for this challenge --
I can't help it -- I just love these colours!
You can find my first and second cards here and here.

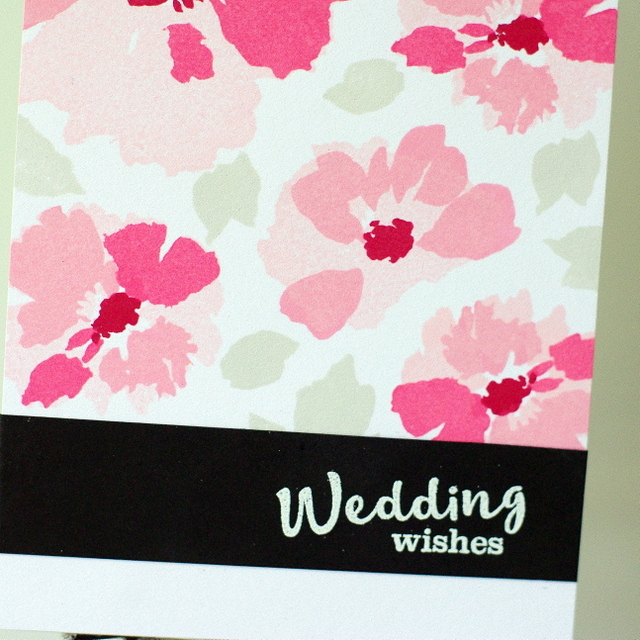
Once again, I used my new Watercolour Wonder stamp set to make my card:


I stamped the blooms all over my front panel, leaving space at the bottom,
 in Frosty Pink, Cotton Candy, Coral Berry and Ruby Red.
The leaves were added in Morning Frost.


I stamped the sentiment (from PTI's Spring Woods)
in versamark on a strip of black cardstock and heat embossed it in white.

So, I made a video the other day for the 
and I thought I'd share it here.
Sage graciously agreed to be my videographer. :)


Note: if the video won't play, you can see it here.

Thanks for looking!

Tuesday, August 16, 2016

Essentials by Ellen August Mix it Up Challenge

A couple of days ago, I posted the cards that Sage and I
made for Session 3 of MFT Camp Create.
Sage was quite funny when we were creating these cards,
because she was frustrated by the limitations of my MFT stamp collection.
She's ask what stamp sets she could use and I'd say:
"Well, I have three floral sets, some snowflakes, a couple of Christmas sets
and the Soda Pop set."
"That's it?!"
She confided that she preferred the Stamp-a-faire challenges
with Papertrey Ink because I have so many more stamps from which to choose. ;)

I wanted to play along with the 
there they're teaming up with Winnie & Walter,
and I had to laugh at what Sage's reaction would be to the fact
that I have one Essentials by Ellen stamp set and one Winnie & Walter set.
She would probably not be impressed. ;)

I, on the other hand, kind of enjoy the challenge of making it work.
I decided to switch things up a little by using the leaf image from my
Mondo Hydrangea stamp set from Essentials by Ellen
with my The Big, The Bold and Blessings stamp set from Winnie & Walter.
Here's my card:


I started by stamping my sentiment in versafine onyx black and heat embossing it in clear.
Then, I stamped the leaves in versamark and heat embossed them in clear.


I coloured them in using my Zig Markers and a water brush.
Using a technique I learned in Heat Wave, a class I took recently at
 Online Card Classes, I spritzed my card with water and then poured
gold embossing powder over it to heat emboss the water droplets.


The hint of sparkle is very cool!

Thanks for looking!

Monday, August 15, 2016

Curtain Call Inspiration Challenge -- Flamingo

The LEAD of the Flamingo Challenge will be invited as a 
Guest Designer in a future challenge!
Please visit the Curtain Call Challenge Blog for all the challenge info and deadline.

I love flamingoes and was inspired by the image at the bottom of the graphic to 
create a card using Reverse Confetti products. 


I started by stamping my flamingo stamps from Fabulous Flamingo
in white onto my aqua mist cardstock background.
I used my heat tool to dry the ink and then stamped them again
(using my MISTI) in pink.
I stamped their beaks (bills?) and legs in versamark 
and heat embossed them in gold.


I stamped the sentiment from Peacock Pretties in versamark and heat
embossed it in white on a strip of black cardstock.


Make sure you visit each of the designers' blogs for more inspiration!
Thanks for looking!
SaveSave

Sunday, August 14, 2016

Camp Create -- Session 3

I was thrilled to see that MFT was offering a third session of Camp Create 
earlier this week and even more excited when Sage said she's play along with me!

So, today, I'm sharing the cards that we made for the week of camp.
Day 1's challenge was Monochromatic Magic.
I wanted to make a card to thank Denise, our slo-pitch
team's organizer and coach.
Since her favourite colour is pink, I knew this would be the 
perfect challenge to make her a card.

I decided to use the stamps and dies from my Flashy Florals kit.


I started by partially stamping my background using the 
MFT Scattered Surface Background stamp.
I stamped the flowers on their coordinating diecuts
and had fun stamping my leaves in pink, too!


I diecut the "thanks" die from white cardstock and blended ink
onto the bottom half of it before adhering it to my card with dimensional adhesive.

Sage used the same background stamp to make her card.


She blended ink onto white cardstock and diecut it
with the Soda Pop bottle dies.
She added the details to the bottles and stamped the sentiment 
(also from Soda Pop) onto it.

We both earned this badge:

Day 2's challenge was Awesome Ombre.
We were both inspired by Laurie's fabulous card to use
the same Geometric Grid stencil that she used.

We also both decided to use this challenge to create birthday cards
 for my twin brother -- whose birthday is today!
Happy Birthday, Chris!

Sage created her card first.


You may know that Sage is new to ink blending -- not that 
you can tell from the results on her cards!
But this was the first time that she blended ink using a stencil -- and she loved it!
She used four shades of ink to create her ombre effect.
She stamped the sentiment (from Soda Pop) and added some enamel dots.

For my card, I used the ColourQ Challenge #354:


Here's my card:


I used my new Clarity Stencil Brushes to apply Hawaiian Shores ink 
to my white cardstock panel.
I, too, used the Soda Pop sentiment, stamping it onto strips of black cardstock
and heat embossing it in white.


I stamped the "Chris" using Hand Lettered Holiday (I selectively
inked the "Christmas" stamp) and added a trio of enamel dots to finish it off.

For this challenge, we earned this badge:

Day 3's Challenge was Remarkable Resist.

For my card, I used the Color Throwdown #405:


I used emboss resist three different times on my card.


I started by stamping the lines from the leaves onto a piece of 
white cardstock in Altenew Forrest Glades. 
Then, I stamped over top in versamark using the solid leaf image, 
which I heat embossed in clear.
I blended Altenew's Frayed Leaf ink over top with my blending tool.
For my background, I heat embossed the Scattered Surface Background stamp
in white and blended Altenew Ocean Waves over top.
I diecut my Flashy Florals blooms and stamped them with Ocean Waves 
in the centre and then a second time in versamark (using my MISTI).
I heat embossed these in clear and then stamped the blooms in yellow
over top, so the centres resisted the ink.


I added a Reverse Confetti All Framed Out diecut to frame my sentiment
(stamped in Forrest Glades using PTI's Phrases and Praises stamp set.)

Sage decided to use the Soda Pop set again to make her card:


She stamped the sentiments onto her card base and heat embossed them 
in white before blending ink over top and spritzing it with water.
She blended ink onto white cardstock and diecut her bottles from it.
It's so bright and cheerful -- I love how it turned out!

Here's the badge we earned:

Day 4's Challenge was Divine Dry Embossing.

For my card, I used my Soda Pop stamp set and dies,


Here's my card:


I started by embossing a MFT Circle onto my background and trimming 
a strip off of the side (I was planning on using something else for my border --
like a dark cardstock, impressed cardstock or patterned paper -- but in the end,
I just replaced the strip, with a bit of dimension for the card front.)
I blended ink onto my circle and adhered my pop bottles over top.


I stamped the sentiments (from Soda Pop) onto black cardstock,
heat embossed them in white and cut them into strips, which I adhered
with dimensional adhesive.
A few wooden stars finish it off.

Sage used the thanks die from the Flashy Florals kit to make her card.


She impressed the die and then diecut it from a post-it note,
which we used to create a mask (I helped her with this, since it was new to her.)
She used my Clarity Stencil brush to brush Hawaiian Shores ink 
over the bottom half of the word.
She stamped the leaf from Modern Blooms in three shades of green to make a wreath.

We both earned this badge:

Next up was a bonus challenge on Thursday evening:

Sage was getting a little tire of making cards, so she decided to
make her previous "thanks" card for both the Dry-embossing Challenge
and for the Bonfire Craft Challenge, since it's a one layer card
 -- we hope that's okay!

And here's my card:


I started by stamping my sentiment (from PTI's Phrases and Praises)
in versafine onyx black ink and heat embossing it in clear onto a piece of watercolour paper.
Then, I stamped the leaves from Flashy Florals in five different shades of ink.


I took a paintbrush dipped in water and "coloured" over my stamped leaves
to create a watercolour effect on my card.

Here's the badge we earned:

And lastly, Day 5's Challenge was Stunning Shadow Stamping .

The store where I sell my cards wanted some anniversary cards,
so I decided, since I was using my MISTI to create my card for this challenge,
to make five cards in five different colours, using Modern Blooms.


I  started by stamped in the flowers and leaves in Wplus9 white
and then moving my panel over slightly and down to stamp the colour.


I diecut the "happy" from PTI's Colour Pop Butterflies kit and trimmed off
the "so" that was attached by hand.
I stamped "anniversary" on a strip of smokey shadow cardstock 
and heat embossed it in white (using PTI's Wet Paint stamp set.)


I adhered the strip using dimensional adhesive.

And here's Sage's card, using stamps from Flashy Florals.


Isn't it pretty?
I think she was getting a little tired of making cards, but decided
to persevere to earn all five badges.
When she was done with this card, however, she was saying
how much she enjoyed this technique. :)

It's always fun stamping with my best girl!

And here's the final badge we earned:

Okay, well, I know that was a lot of cards for one post
but I hope you'll indulge me -- it is my birthday after all! ;)

Thanks for looking!