Saturday, July 27, 2013

Summer Card Camp 2: Cards #20 & 21 and one from Sage


I have two more cards to share today that I made this week for the Summer Card Camp 2 class. I've never taken an online card class before and have enjoyed it so much! I'm quite sad that it's almost over....

So, for my first card that I sharing, I used this week's colour combo as well as the layered patterned paper and vellum techniques that Nichol Magouirk shared on Day 2 of this week. My card is actually quite similar to hers...

I used some Basic Grey patterned paper and Papertrey Ink card stock & vellum, stamps (boutique borders: birthday for the sentiment) & dies (double-ended banner, beautiful butterflies, tag sale #5). I layered some diecut vellum over the large banner and over the butterfly (I also diecut the butterfly with some Prima patterned paper) and I added a My Mind's Eye decorative brad to finish it off.


My second card uses one of yesterday's new colour combos (the fourth one), Week 3's first sketch and some Mama Elephant Wanderlust stamps. I stamped the map image using Kristina's masked embossing technique (minus the embossing) to make a stamped banner on the card. I layered some washi tape over top, as well as a stamped sentiment that I raised up with some dimensional adhesive. I also used Amy's technique to add colour to a heat embossed image: I stamped the "not all who wander are lost" banner image onto some vintage cream carstock in Versamark and heat embossed it with clear embossing powder. Then, using a Tim Holtz ink blending tool, I added some summer sunrise ink to colour in the letters. I fussy cut it out and added it to my card. Some PTI buttons stitched in place finish it off.


And Sage needed to make a birthday card for her dad and decided to play along using Week 3's second sketch and one of yesterday's new colour combos (the last one.)

She used PTI's on the farm stamps and dies, as well as a double-ended banner die. The only thing I helped her with was shortening the banner and wrapping the twine around her card. She even tied the bow herself. (And look at how perfectly centred and straight her sentiment is stamped on that banner!)


Thanks for looking!

Friday, July 26, 2013

Summer Card Camp 2: Cards #15 - 19


I have five cards to share today that I made this week for the Summer Card Camp 2 class I've been enjoying immensely. I'm going to be so sad to see this class come to an end!

I used this week's colour combo on all of my cards, which I have to confess, was a bit of a stretch for me.

For my first card, I inked up my new Hero Arts background stamp (isn't it gorgeous?). On my first attempt, I tried to ink it up a second time with brown and then stamp over a bit, but the stamp is cling and I couldn't see well enough to make it work. So I stuck with one layer. ;)


I did follow Jennifer McGuire's cook trick for my diecut letters from Day 1. I usually line up my dies on my cardstock and then take a post it note and layer it over top, hoping they'll stay lined up. Jennifer suggested turning the post it not over and placing the dies upside down on the post it note to line them up. Then, you lay it over the card stock-- brilliant! The "l" is a little crooked though because I had to run it through a second time because I only have one "l" die. I also impressed it with my PTI Linen & Canvas IP, to remove the marks left by the dies.

The flower dies and stamps are Wplus9's Fresh Cut Florals.

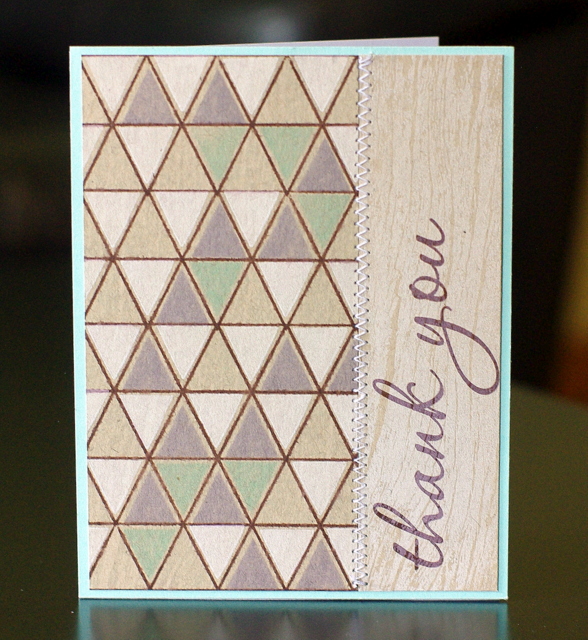
For my second card, I decided to tackle Jennifer's layered background stamp technique a second time, using Mama Elephant's Trifecta set (which I stamped the outline in brown onto kraft cardstock and then stamped in some of the triangles in fresh snow, winter wisteria and aqua mist. Then I stamped over the cardstock using WMS woodgrain stamp in soft stone. For the sentiment, I stamped the same stamp onto the kraft cardstock in fresh snow. The sentiment is PTI's Think Big Favourites #5.


I'm linking up this card to the Trendy Triangles Challenge at Moxie Fab World, where I was inspired by this photo:


For my next two cards, I used Betsy Veldman's colourblocking with diecuts technique. I used some patterned paper from my stash and the Wonderful Words: Hello die and stamp set. I diecut the banners from white cardstock using my double-ended banner die. For the bottom one, I used Shari's coloured die cuts technique and swiped it with a lavender mist ink pad.


And on this card, I used the same techniques and the leftover hello diecut, as well as this week's third sketch.


I used Kim's watercolour + dry embossing technique from Day 3 this week for the bottom half of my card, using my PTI woodgrain impression plate and lavender moon ink. I diecut the scalloped border using PTI's heart border die. The little flowers at the top are left over from my first card. It's fun playing with the same colour combo all week-- I have left over stuff that I can use on another card! :)

And my last card uses a few more leftover stamped flowers.

This card was for Day 4's challenge to create a card in a style different than your own. I decided to go very CAS with my card...


I stamped some PTI Chevron Stripes onto a kraft diecut from PTI's Tag Sale #5. I added a double-ended banner die cut, stamped with a sentiment from WPlus9's Fresh Cut Florals. I layered on some flowers and tied on some twine and adhered it to my card using dimensional adhesive.

I was really hard to me to not mat it on some aqua mist cardstock and add some stitching! LOL!

I'm inking up my last card to Wplus9's Monday Mood Board #17.

Thanks for looking!

Thursday, July 25, 2013

PTI July Blog Hop


*This is my second post for the day. Please scroll down to see my 
Fresh Squeezed Stamps release post.*

Once again, I'm playing along with the Papertrey Ink monthly blog hop. This month's challenge is a colour challenge. Nichole posted six colour combos, accompanied by the yummiest summer images. So, of course, I challenged myself to create a card for each colour combo.

For this first colour combo, it was the last card I created. The other five I made last weekend, but for this one, I waited until Monday, after I'd picked up my PTI order. I used my two new sets: Boutique Borders: Love and Delightful Dahlia Additions. I added a fifth colour for the largest dahlia: sweet blush.


The sentiment is from Wplus9's Fresh Cut Florals stamp set. I finished off my card with some stitching, buttons and twine.

For the next colour combo, I paired my PTI Cutting Garden set with some Teresa Collins patterned paper. The melon berry stripes just screamed summer to me.


The sentiment is from PTI's Pedal Pusher stamp set.

I had to admit, this colour combo gave me the most challenge, even though it was one of my favourite photos. I struggled with putting these colours together and started several different cards but didn't like any of them. Then, I decided that what I liked about the photo was that there was so much aqua mist and white, and just a little bit of the other colours. So, I decided to create my card that way.


I stamped my BB:Woodgrain set onto aqua mist cardstock and heat embossed it with white. I rubbed my PTI Fresh Snow ink pad along the edges, before adhering it to the background card stock panel. For the tag, I used Fillable Frames 9 (with the coordinating die), Cutting Garden and Lovely Layers (for the sentiment). I added a scarlet jewel button and some twine.

For this one, I started a card with Lovely Layers, but didn't like how it turned out. So I started over with  Embroidered Blooms.


I did some stamping on the die cuts and heat embossed with white on the largest bloom. It's hard to tell, but I ran the whole panel through my Big Shot with my Simple Stripes impression plate. Some SU! pearls and a MME decorate brad finishes everything off.


I'd gone over to my friend's house last Friday to stamp and had some fun just stamping on some diecuts with Cutting Garden (see my second card above) & The Sweet Life. I'd decided not to worry about how the cards would be put together, but just enjoyed stamping and visiting with my friend.


I used my Simple Stripes IP again, as well as a sentiment from Think Big Favourites #3.

And last, but not least...

I think that this was my very favourite inspiration photos. I mean, how gorgeous and yummy are those popsicles? I thought right away of trying to recreate those icy treats.


I cut strips of cardstock in the colours listed in the colour combo, adhered them to a thin piece of cardstock and trimmed them down, rounding the corners with my corner rounder. Then, I ran them through my crimper. After that, I pressed them into my Versamark pad and heat embossed them with clear embossing powder to give them a glossy sheen. I created the popsicle sticks with some Crate Paper patterned paper (the same paper I used for the background. The sentiment is from Strawberry Patch Sentiments, stamped in scarlet jewel and hisbiscus burst (I also heat embossed the "sweet" with clear embossing powder.)

I'm also linking this last card up to this week's Simon Says Stamp Challenge: Summer Food &/or Drink.

It was so fun creating these summery cards using the fabulous colour combos!

Thanks for looking!

Beachy Keen


Welcome to Day 2 of the peeks for the newest release for Fresh Squeezed Stamps!

There are some wonderful new sets being released this week and today, I'm excited to share a card that I made using a perfect new beach set called Beachy Keen.

Here it is...


I used some fun patterned papers to complement this stamp set! I paper-pieced the little umbrella and waves for the sea. And I stamped that sweet beach chair on some kraft cardstock. Doesn't it just make you want to hit the beach?

I framed my little scene using a Polaroid frame diecut. The sweet sentiment is also from Beachy Keen-- it's so perfect for a "just because" card! A couple of half circles punched in the patterned paper, and some buttons & twine finish it off.


So, you'll want to head to the Fresh Squeezed Stamps blog for more inspiration from the other DT members using Beachy Keen. There you will see the full stamp set AND have a chance to enter for your chance at the giveaway of this set!

Thanks for looking!

Wednesday, July 24, 2013

Sublime Citrus


Welcome to Day 2 of the peeks for the newest release for Fresh Squeezed Stamps!

There are some great new sets being released this week and today, I'm sharing a card that I made using the new set called Sublime Citrus.

Here it is...


I had a lot of fun making this one! To start, I stamped my pitcher and glass with ice cubes images onto vellum using Versamark and heat embossed them with white embossing powder. Then, after fussy cutting them out, I took a Q-Tip dipped in yellow ink and coloured on the vellum to make my lemonade. I stamped two sentiments from Sublime Citrus stamp set, as well as the lemon wedge image and impressed the cardstock using a woodgrain impression plate. I adhered my stamped vellum images to the diecut cardstock and layered this over some patterned paper and cardstock.

Isn't it sweet? I just love all the white and yellow-- so crisp and fresh!

So, you'll want to head to the Fresh Squeezed Stamps blog for more inspiration from the other DT members using Sublime Citrus. There on the blog you will see the full stamp set AND have a chance to enter for your chance at the giveaway of this set!

I'm also linking this card to this week's Simon Says Stamp Challenge: Summer Food &/or Drink.

Thanks for looking!

Tuesday, July 23, 2013

Everyday Expressions


Welcome to Day 1 of the peeks for the newest release for Fresh Squeezed Stamps!

There are some fabulous new sets being released this week and I can't wait to show you what I've created with them! To start us off, I'm sharing a card that I made using the prettiest stamp set...... Everyday Expressions.

Here's the card that I made...


I masked and stamped the flower and leaf images to create a bouquet. I also stamped two of the sentiments from the set (aren't they beautiful?) To finish everything off, I added some enamel dots, which work perfectly with these blooms! I layered my panel over some patterned paper with some dimensional adhesive.

Isn't this stamp set pretty?

Now, you'll want to head to the Fresh Squeezed Stamps blog for more inspiration from the other DT members using Everyday Expressions. There on the blog you'll get to see the full stamp set AND be able to enter for your chance at the giveaway of this set!

Thanks for looking!

Monday, July 22, 2013

Summer Card Camp 2: Card #14 & a bonus card


I have two cards to share today...

The first one is for one of Week 2 Day 5's additional colour combos. I used Lawn Fawn's Summertime Charm jar stamp and die cut. I diecut the vellum and layered it over an aqua mist die cut (I stamped the stems on the vellum before adhering the vellum layer over top. (The sentiment is from Wplus9's Fresh Cut Florals set.)


For the flowers, I used PTI's Cutting Garden. Some twine, stitching and a button finishes everything off.

My next card is for the Curtain Call Inspiration Challenge: Felling Nautical.


I used some Papertrey Ink cardstock & twine, Fancy Pants patterned paper and some stamps designed by Ted Mattos.


I stamped the anchor onto some PTI shimmer card stock and fussy cut it out.

I'm also linking this up to this week's Simon Says Stamp Challenge: By the Sea.

Thanks for looking!

Sunday, July 21, 2013

Summer Card Camp 2: Card #13


I have a card to share today that I made for the Summer Card Camp 2 online class. It was for Week 2's Day 4 challenge, which I found to be very challenging-- create a non-holiday card using holiday stamps.

I seriously thought about this one for a while. I decided that I would have preferred a "create a holiday card using non-holiday stamps" challenge. But, that's not what was issued...

Finally, yesterday, after a little blog hopping online, I was inspired by Sketch #37 at CAS(E) this Sketch:


I remembered that I had a Simon Says Holiday Labels stamp set that had a couple of hexagon stamps in it, so I pulled it out, combined it with Week 2's colour combo and created this card:


I deviated from the sketch a bit, deciding to frame in my sentiment with the hexagons, combining it with Sketch 3 from the class. I love this colour combo and decided that the snowflakes on the off-white hexagons could be viewed as a medallion, if you didn't know if was a winter set. Right?

I also used Papertrey Ink cardstock & Birthday Wishes stamp set (for the sentiment) and some Crate Paper patterned paper.

Thanks for looking!

Friday, July 19, 2013

Love you lots


It's Friday, which means it's my day to post for Fresh Squeezed Stamps.

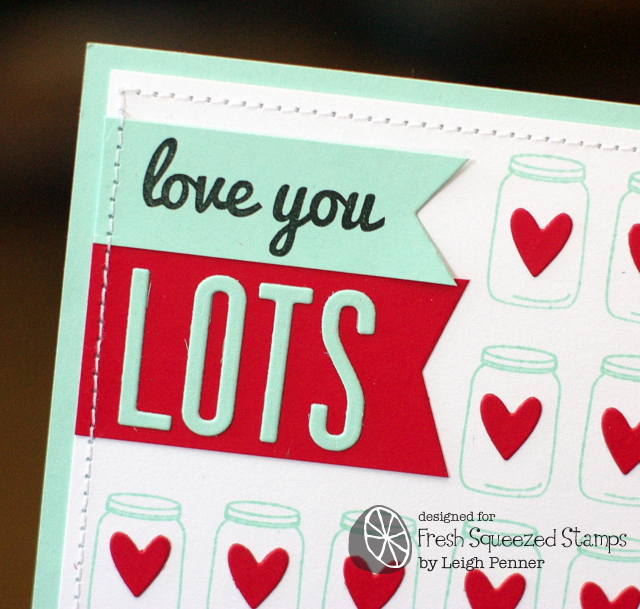
Now, I have to say that sometimes I'm drawn to a single stamp in a set and I must have it. This was totally the case for me with the Breath of Fresh Flair stamp set-- I was totally drawn to that little canning jar image! Here's a card that I made with it.


I stamped the little jars repeatedly on my card and added some die cut hearts to fill them all! I just think they look so sweet!

I also added some banners with my sentiments. I used some alphabet diecuts for "lots" and stamped the "love you" from You Said It, Sister.


Thanks for looking!

Thursday, July 18, 2013

Summer Card Camp 2: Cards #8 -12


I got a little behind on my homework for the Summer Card Camp 2 class I'm taking, so after cleaning the house this morning with the kids, I rewarded myself with some stamping-time this afternoon.

I got five cards made using the Week 2 colour combo, which I found lent itself to make some masculine cards.

The first card I made was inspired by Jennifer's card from Day 1 from this week. I made a card with a window, but instead of it opening up to the inside of the card, I just popped it up. I used Little Yellow Bicycle patterned paper, my new WMS Fancy Feathers stamps and some Papertrey Ink cardstock and buttons. 


With this angle, you can see how the front panel is raised a little off the card...


Using the same papers and stamps, I created a birthday card using the second sketch from this week. I also used Donna's tone on tone embossing technique with my feather, where I heat embossed my stamped image with clear embossing powder after stamping it on patterned paper. I diecut the banners using my PTI double-ended banner die and the sentiment is from PTI's Bountiful Banners.


Next, I thought I'd make a card for my husband, whose birthday is coming up at the end of this month. I pulled out my PTI On the Farm stamp set and dies. I stamped the background grass several times, alternating its orientation. This left me with a bit of a gap, which I filled with a Bountiful Banners diecut and stamped image. I was thrilled with how perfectly the On the Farm sentiment fit in the banner!


For the cow, I repeated Donna's tone on tone embossing technique on a dark chocolate cardstock die cut. I love how glossy she turned out!


Next, I decided to make a card using Sketch #1 from this week. I don't usually make shaped cards, so this was a little challenging for me. I don't have circle dies, so I had to use my CM circle circles. I stamped a couple of Mama Elephant On Target stamps and added a PTI Birthday Style stamped sentiment on a Get a Handle On It diecut banner.


And lastly, I made a card for Jonah's birthday which is coming up in August. I asked him what kind of theme he wanted for the card and he said video games. So, I used some PTI Boy Basics stamps (Game On & Simple Circles). I used this week's Sketch #3. I layered my stamped panel over some Fancy Pants corrugated card stock. For the small outlined circles, I used Jennifer's technique from Day 1 this week where she encouraged us to stamp with something other than stamps. These circles were stamped using the end of a cap from a SU! marker.


And there you go! So, I'm caught up on the first three days for this week, but I still need to figure something out for today's challenge. 

Have I mentioned how much I'm enjoying this class? :)

Thanks for looking!

Wednesday, July 17, 2013

10 Minute Craft Dash #22


Today, I'm posting the cards that I made for the 10 Minute Craft Dash Challenge #22. That's right, I said cards. If you know me, you know that before I joined the DT, I participated in the Craft Dash and often didn't succeed my first time. I don't know why I thought that by joining the DT, that I would succeed each time.

Well, I learned that this isn't true.

Case in point... my first card.

I was very excited about the colour combo, because I have become a real lover of navy. I have this navy blue striped top that I like to wear with my white capris. On it, the navy blue stripes are wider than the white stripes. So I thought I'd do this on a card with some card stock. Then I decided I'd stamp a cute cluster of flowers using my Wplus9 Fresh Cut Floral stamps and dies. I was doing really well, too. I'd had my flowers diecut and stamped and my sentiment stamped when I glanced at my time.....

10:06.

Oh. Well.

I stopped the time and finished up, adhering my flowers and adding some navy blue stamped dots to three of them. I not sure what my final time was (maybe 14 or 15 minutes-- still pretty darn quick for me, let me tell you. ;)  ) But I was quite happy with it.


So, this means that I had to start over. And since I was so pleased with my idea and my card, I flipped through my stamps to find something else that would work..... and found my World Map set. Sigh.

I decided to stamp the map with navy and green inks and to try to keep the green to the continents. I stamped in green first, added the navy to the stamp and then wiped off a little over the continents and reinked them in green. Here's the result:


I added a Mama Elephant stamp (from Wanderlust), stamped on a PTI Get a Handle on It die cut. I stamped the compass from Road Trip in berry sorbet, cut it out by hand and tucked it behind the banner. Then I added a few Simple Stories decorative brads (the plane and the navy and green ones) and a Teresa Collins decorative brad in berry.

And my time....


Success!

Now it's your turn.... Click here to visit Paulina's blog where you can see what the rest of the DT made for the challenge AND where you can link up your project for the chance to win this....


Thanks for looking!