Showing posts with label The Card Concept. Show all posts

Sunday, May 06, 2018

Make It Monday #321 & The Card Concept #92

Hi there!
I'm popping in this afternoon to share a card that I made for this week's

I was also inspired by the inspiration photo at 
The Card Concept #92 {Bold Bloom} when I chose my colours:


Here's my card:


I started by stamping the butterfly from PTI's Ever So Much in versamark
on a sheet of coral berries cardstock and heat embossing it in cream.
I then layered a Tim Holtz stencil over my panel and blended Altenew Coral Berries
ink over top.
I also blended the ink onto the wings of the butterfly, without the stencil.


I stamped the sentiment (from MFT stamps) onto a piece of black cardstock
in versamark and heat embossed it in cream to match the butterfly.
I trimmed it out and adhered it to my card using dimensional adhesive.

Thanks for looking!

Wednesday, January 31, 2018

The Card Concept #85 {Rustic Blooms}

Today, I have a card to share that I made for


I decided to use my Fantasy Floral stamps and dies to make my Clean & Layered card:


I stamped my blooms in Altenew Inks: Frosty Pink, Cotton Candy, Coral Berry
and Ruby Red, as well as PTI's Simply Chartreuse.
I stamped my aqua mist panel with my Concord & 9th Barnwood Background stamp
in Altenew Rocky Shore.


I stamped the sentiment from Papertrey Ink's A Second Helping of Sunshine in 
versamark ink on a strip of black cardstock and heat embossed it in white.
I adhered it with dimensional adhesive.

Thanks for looking!
SaveSave
SaveSave

Wednesday, September 13, 2017

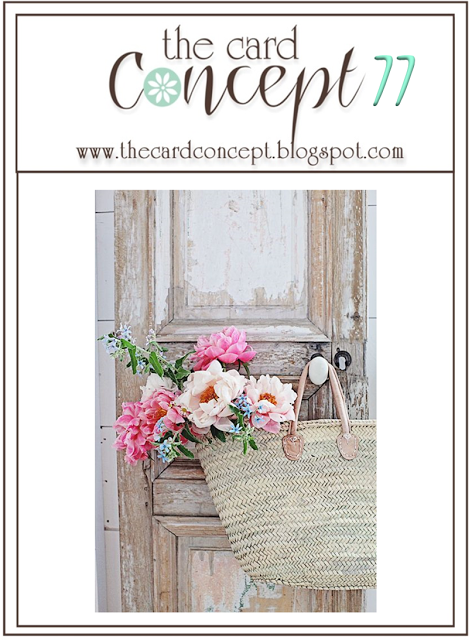
The Card Concept #77 {Weathered Florals}

Today, I have four cards to share that I made, 


Isn't it gorgeous?
Our church hosts the birthday party every September for the residents
at the Tabor Home (our local nursing home.)
For the past five or so years, now, I've been asked to make cards for the 
residents who have birthdays this month.
This year, I needed to make four feminine cards and one masculine card.
This photo was absolutely perfect inspiration for me to make the feminine cards!

I decided to use my Wplus9 Modern Peonies to make them.


I started by stamping the leaves, bud and sentiment onto watercolour paper
in versafine onyx black ink and heat embossing them in clear.
Then, I coloured them in using my Zig Clean Colour Real Brush Markers
and a water brush and ran them through my diecutting machine with my
Papertrey Ink Woodgrain Impression Plate.


I diecut repeated this stamping and colouring with the bloom and diecut them
out using their coordinating die, before adhering it to the card.
I matted it on Reverse Confetti cardstock.

I decided to colour each of them differently...


Thanks for looking!

Sunday, January 22, 2017

The Card Concept 65

Today, I have a card to share for 


Here's my card, using Reverse Confetti products:


I started by diecutting my and layering it over a piece of Stone Cardstock.
I diecut my Blooms 'n Buds Confetti Cuts and stamped them with their
coordinating Blooms 'n Buds stamps in
Rose InkSalsa Ink Tangerine Ink & Stone Ink.


I stamped my sentiment from Whole Lotta Thanks in versamark on a strip
of black cardstock and heat embossed it in white.


Thanks for looking!
SaveSaveSaveSave

Tuesday, January 10, 2017

The Card Concept #64 -- Pretty Things

Today, I have a card to share that I made for


I decided to use some patterned paper from my stash to make my card,
which is clean and layered.


I stamped my new Altenew Adore You stamps in versamark on the Crate Paper
patterned paper and heat embossed them in gold. 
I fussy cut some of the leaves and the one bloom and adhered them to my card.


The sentiment was stamped in Altenew Jet Black (I love this ink!)
using Simon Says Stamp's Big Scripty Sentiments stamp set.

Thanks for looking!
SaveSave

Friday, November 04, 2016

Five for Friday

Well, we've had another full week....

1. On Sunday, the kids and I drove to Winnipeg to attend C4:
Central Canada Comic Con.
We had a great day!


Austin wanted to wander around on his own, so for most of the day, 
it was just Sage, Jonah and me.


Here's Jonah in his Boba Fett hoodie with some fellow Mandalorians.


Sage was dressed as Rosabella Beauty:  the daughter of 
Belle (Beauty) and the Beast in the Ever After High Series.
When we saw another cosplayer dressed as Belle,
we asked if we could take a photo together.
Sage made a lot of her costume herself -- she stencilled on the roses
onto her top and her overlay skirt.
She also made all of the felt flowers and put together her headband.


It was very fun just hanging out together.
And I got some Christmas shopping done, too -- bonus!


2. Sage decided that she wanted to go trick or treating on Halloween,
so she and I went out together.


It was cool and raining, so we took the car and just drove around to friends'
houses to stop and say hi.
It was a nice evening together.
I dressed in my TARDIS costume and Sage was Hermione Granger from Harry Potter.


3. Wednesday was take your kid to work day for the Grade 9s,
so Jonah got to come and spend the day at my new job.


He got a safety orientation, tours of the two plants & a pizza lunch.
He also got to assemble some kids' tables and chairs
and shadow me a little and try out my design program, too, 
where he redesigned our kitchen.


4. And speaking of work.... look who got business cards!


5. And lastly, I couldn't resist making a card for


Isn't it pretty?
I love the typewriter paired with the flowers, so I pulled out a couple of older sets --
Mama Elephant's Type It and Wplus9's Fresh Cut Florals -- to make my card.


I'm sorry the colours aren't great in my photo -- it's always dark when I'm at home now!
I started by diecutting the typewriter and flowers and stamping them in Altenew inks:
frosted pink, cotton candy, coral berry, frayed leaves, forest glades and mountain mist.


I stamped a few leaves on the background, which I diecut using my new
Neat and Tangled scalloped dies.
I layered this over some sweet blush cardstock (it's lighter in real life!)
I adhered the typewriter with some dimensional adhesive
and stamped the sentiment (also from Type It) in versafine onyx black ink.

Thanks for looking!
SaveSaveSaveSave

Friday, June 03, 2016

The Card Concept #56 {Sweet Tea}

Today, I have a Clean & Layered card to share for


I fell in love with this photo and the idea of adding a flower to a tea cup.


I decided to use my Reverse Confetti goodies to make my card.
I stamped the cup from Caffeinated Cups and then did some masking
to stamp the top of the take out cup as my saucer.
A little more masking and I was able to add one of the flowers from Rose Garden.
I coloured in my cup and saucer with my Zigs and some water and a paintbrush.
I added details to my rose using my Zigs as well.


I was inspired by the gold frame with the writing in it in the background
of the photo, so I created a frame for my teacup by diecutting my
watercolour paper with the largest scalloped circle from
Circles 'n Scallops Confetti Cuts, masking out the circle in the middle
and applying Delicata Golden Glitz ink with my blending tool.
I stamped the sentiment (from Rose Garden) with the Golden Glitz
ink but I stamped off once before stamping each time, so
the effect would be more subtle.
I stamped it once in Wplus9 Ocean Drive, to match the outline of the cup.
A button and twine finishes it off.


Thanks for looking!

Tuesday, May 17, 2016

The Card Concept #55 {You Are My Sunshine}

I'm really enjoying playing along with Anna Kossakovskaya's CASometry Challenge 2. Make 5.
She is challenging us to make five cards using the same stamp set.
This is such a great idea -- especially for someone like me who always tends to want to grab
my newest stamps to play with.


I had all sorts of ideas, but then remembered Anna's Challenge,
and decided to use my PTI Spring Woods stamp set to make my Clean & Layered card.


I started by using my PTI Scene IT: Skyscapes sunburst die as a stencil and blended ink
onto my background panel.
I diecut the Spring Woods branch and bird and stamped them in Altenew Dark Chocolate,
PTI harvest gold, bright buttercup, summer sunrise, limeade ice and simply chartreuse.
I used my MISTI and added ink to my stamps a second time, using the rock 'n roll technique.
I adhered these to my card, using dimensional adhesive for the bird.


I stamped my sentiment using Reverse Confetti's Lovey Words Coordinates 
("you are my") in dark chocolate.
I used the same rock 'n roll technique on my "Sunshine", which is from 
Studio Calico's Sending You Sunshine stamp set.

Thanks for looking!

Wednesday, May 04, 2016

The Card Concept #54 {Spring Flowers} & Muse #164

Today, I have two cards to share.
The first one is a Clean & Simple card to share that I made

  
I just love this beautiful image!
I decided to use my Ellen Hutson Mondo Hydrangea stamp set to create my card.


I started by stamping my hydrangeas two different shades of Altenew Ink: Lavender Fields & Midnight Violet.
Then, using my MISTI, I stamped them in the same spot again in versamark and heat embossed them in clear.
I did a little masking and then stamped the leaves, using the same technique, but with Altenew Forest Glades.
 Then, I used my Zig Markers, a paintbrush and some water to colour in my flowers.


I coloured with a Zig marker onto my acrylic block, added water and using a paintbrush,
added colour to a strip of Crate Paper text patterned paper.
Once it was dry, I adhered it behind my panel.
The sentiment is from Altenew's Best Mom, which I stamped on a piece of black
cardstock and heat embossed in white.
A few rainstones finish it off.

My second card is for the Muse Card Challenge #164:


I was immediately inspired by Michele's beautiful card.


I stamped the watering can and tools using PTI's Garden Variety
and filled the watering can with Wplus9 Fresh Cut Florals.


I decided to use my new PTI Inspired Faith stamps to stamp the sentiment.


I had a bit of a smudge on my cardstock, so I added a PTI Colour Pop Butterfly
to cover it up.


Thanks for looking!