Showing posts with label mini-album. Show all posts

Wednesday, January 29, 2014

Guest designing for Top Dog Dies

A little while ago, I was contacted by Top Dog Dies, 
and asked if I'd like to work with some of their products.  
Um, yes, please!

You may not know Top Dog Dies.  It is a new online store that offers their own brand of wafer-thin and steel-rule dies, along with dies from brands you already know and trust, including My Favorite Things, Sizzix, Savvy Stamps, and Cheery Lynn Designs.  Tog Dog Dies is also the leading U.S. retailer for Tattered Lace, a new line of intricate dies designed by U.K. designer Stephanie Weightman.

One of the projects that I'm sharing today is a mini-book I made using their Heart Mini Album die.
I decided to make it about all of the things that I love.


For my album I used a mix of Crate Paper and Fancy Pants patterned papers.
For my cover, I used a Reverse Confetti Love Note heart die, backed with a 
Crate Paper embellished heart.
The arrow is part of the Heart Mini Album Finishers Set, which I die cut from some 
smokey shadow cardstock. The decorative brad is My Mind's Eye.
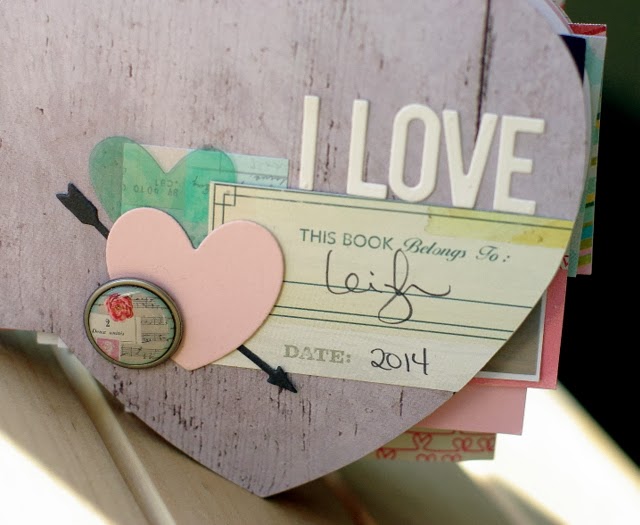

The alphabet dies that I used on the cover and throughout the mini book are Mama Elephant.


I'm not sure what happened, but I ended up cutting my back panel incorrectly, but I was able to salvage it by die cutting it again with the large heart die from the Heart Mini Album Finishers Set
-- so fabulous that they are exactly the same size!

Top Dog Dies also sent me an adorable Onesie Card die, 
which I used to make a baby card for Jonah & Sage's kindergarten teacher.


I die cut the Onesie Card die from sweet blush card stock.
I diecut a heart (using Reverse Confetti's Love Note dies) from the front panel.
I stamped the sentiment from Reverse Confetti's Lots to Say stamp set.
Then, I die cut the onesie liner from Onesie Card Finishers Set and layered it under the front panel.
I traced the heart with a pencil and proceeded to fill it in with some Pretty Pink Posh sequins. 
Then I adhered it to the front panel using some dimensional adhesive.


My favourite thing about this card?
The back.


I stitched on some ribbon to give it a ruffly bum!
Another Onesie Card Finishers Set die cut adhered to the inside 
hides the stitching.

I hope you like my projects and check out Top Dog Dies for yourself!  
They are kindly allowing me to run a giveaway!


All you have to do to be eligible is click *HERE* and register on their giveaway page.  
You can earn additional entries by commenting on this blog post, liking their facebook page, and following them on pinterest, instagram and twitter.  
The Deadline to enter the giveaway will be Sunday, Feb. 2 at midnight.

Thanks for looking!

Monday, July 23, 2012

A few more projects...


I got two more cards completed last night, for the the Homemade Embellishments Challenge at Stamp-a-Faire. This first one was for Dawn's layered butterfly technique:


I used Papertrey Ink cardstock (raspberry fizz), stamps (think big favourites), button, twine & dies (beautiful butterflies, half & half, love lives here.) For the largest butterfly, I cut it out by hand. The patterned paper is Echo Park.

For this next card, I used Danielle's "make your own washi tape" technique:


I used Papertrey Ink cardstock (aqua mist), patterned paper (aqua mist), stamps (think big favourites), buttons & twine. The patterned paper is My Mind's Eye.

Then, last night, I was thinking of a way I could use all of the badges. Originally, I'd thought it would be fun to use them on layouts, but they coordinate so well together, I decided to make a mini-book with them, on the theme of what I love about summer. I used PTI cardstock (aqua mist, rustic white), patterned paper (aqua mist) & dies (modern alphabet, heart prints, fabulous frames).


For the cover, I used Erin's ribbon technique & Danielle's "make your own washi tape" technique.


For the book, my plan is to print and add photos on the left-hand side of each of the pages that will correspond with what's on the right hand side.


For this page, I used Heather's make your own stitched embellishments technique, with vintage cream felt and a little house I cut from some Pink Paislee patterned paper.


Again, I used Heather's make your own stitched embellishments technique, with aqua mist felt and a stamp from Tremendous Treats birthday.


Again, I used Heather's make your own stitched embellishments technique, with aqua mist felt and a stamp from Road Trip.


And, once more, I used Heather's make your own stitched embellishments technique, with simply chartreuse felt and seeing stars die cut from aqua mist patterned paper.


What a great way to house all of these sweet little badges!


Thanks again to Nichole & the DT for putting on such a fabulous event!

Thanks for looking!

Sunday, July 22, 2012

A few more badges earned


I wanted to share a few more projects that I completed to earn my badges this weekend...


The first project I want to share took me a long time to make yesterday. It was for the mini-book challenge
and I really need to remember the next time I tackle a mini-book that it takes me a long time to make them.


It was originally going to have more pages, but I ended up shortening it. I used Ashley's envelope mini-book tutorial, but made it with cardstock pages instead of envelopes. How I adhered it together was the same though...

I used PTI cardstock (rustic white), stamps (the sweet life, shutterbug special, fabulous frames, strawberry sentiments simply you, lovely layers), twine, button and dies (fabulous frames, the sweet life, modern alphabet, modern numbers). The patterned paper is mostly Crate Paper, found in my scraps.

Here's the cover:


I stamped these flowers using PTI ink: canyon clay, stamped off, then harvest gold and then canyon clay, full strength.


For these roses, I used PTI ink: ocean tides, stamped off, then aqua mist and then ocean tides , full strength. The leaves were stamped with spring moss ink. For the top one, I stamped off first, but for the bottom, I stamped full strength both times.... and was quite pleased with the results!


I told Austin that on his page, I put the saying "You and I just click." He looked puzzled. "What do you mean, click?" he asked. "Like a mouse?" Ah, yes, the computer generation! LOL!


For the flowers on Jonah's page, I used PTI ink: aqua mist, stamped off, then aqua mist full strength and then Hawaiian Shores. I love my new Modern Alphabet dies--- you'll be seeing them a lot on my future projects!


For Sage's roses, I used PTI ink: sweet blush, hibiscus burst and raspberry fizz.


And for my final page... look how wonderfully the middle size bloom from lovely layers fits in the fabulous frames frame!


This afternoon, after lunch, I watched Nichole's video for the Tie-Dye Techniques. Since I don't have any copics or shaving cream, I went with the Dye Ink technique and made this card:


I used PTI cardstock (stamper's select white, aqua mist, simply chartreuse), buttons, twine, and half & half stamps and dies.


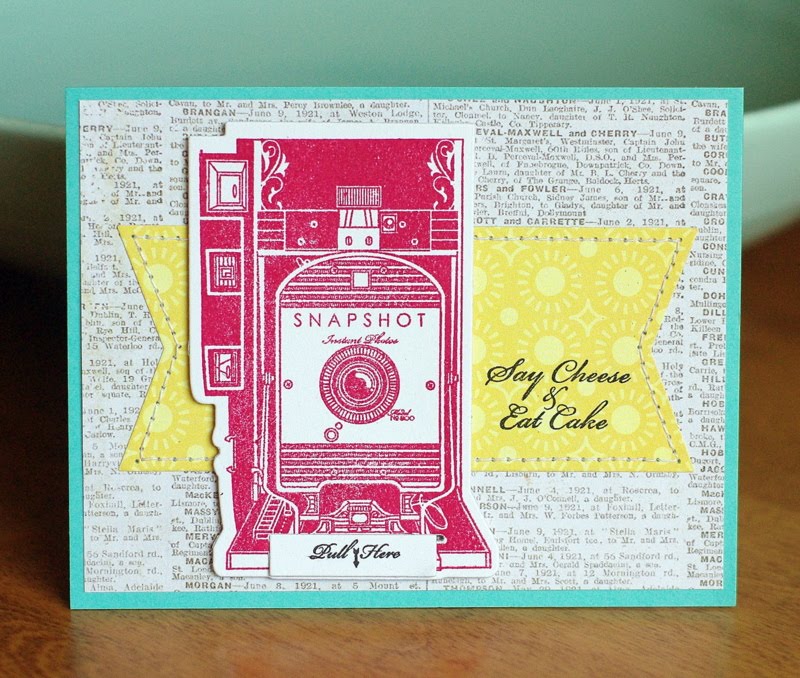
We were invited to Cameron's uncle's 80th birthday, so I made the above card in mind for him, but I also thought using Shutterbug Special could be cool (who knows... maybe he used to have a camera like that!), so I used Ashley's homemade stitched embellishment ideas for the Homemade Embellishments challenge and stitched on my tag that I made with using the end half of the Tag Sale #5 die.


I used PTI cardstock (rustic white, hawaiian shores), stamps (shutterbug special, tremendous treats birthday) and dies (shutterbug special). The patterned paper is Echo Park (text) and Pink Paislee (suns).


I added the little pull out diecut with a little surprise on it...


I let Cameron choose which card to give. He liked the camera, but was worried they wouldn't see the small print to pull out the "photo", so we gave them the tie-dye card instead.

Well, I'm off to make some friendship bracelets with Sage...

Thanks for looking!

Monday, January 02, 2012

A mini- album

Ever since I got some papers from the Generations line by Simple Stories and some 8x6 photos printed through a special at Black's (50 6x8 photo for $5), I've had an idea to make a mini-album using some favourite family photos.

However, for me, mini-albums are always something I can push off until another day, so I was really thankful for Lee's Papertrey Princess challnge to make a mini-album. It was just the motivation I needed to get it done.

I loved the vertical journaling card elements that were 4x6 inches. So I cut apart some of my boxes that my Papertrey Ink stamps came in and sewed one to a card, stitching them together with my sewing machine. These made great pages to separate some of my photos.

For the album, I used Simple Stories patterned paper & letter stickers, Papertrey Ink cardstock (rustic cream), stamps (love & marriage) and dies (mega mat stack #4, heart border, fillagree border) & twine. The key is My Mind's Eye.

To bind it together, I took it to our local print shop where they coil bound it for me for $4.


Thanks for looking!