Saturday, March 19, 2016

The Challenge #64

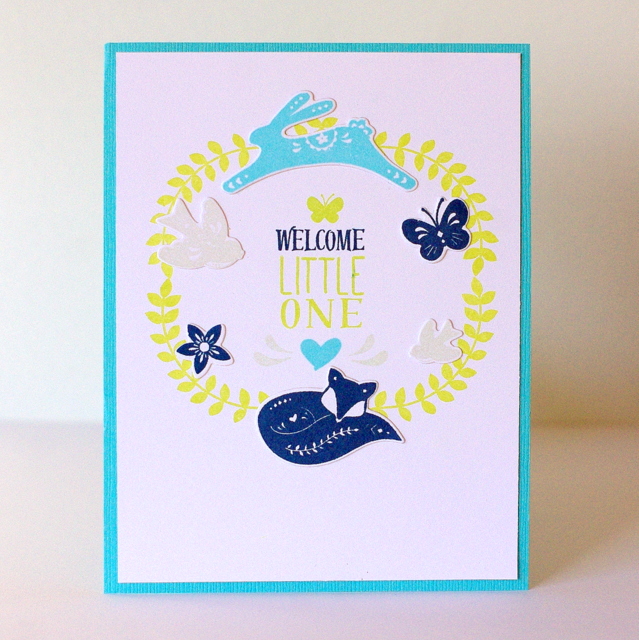
Today, I have a card to share that I made for The Challenge #64:

I love this colour combo and was inspired by the photo
to make a baby card.


I stamped on my card front and onto the coordinating diecuts
using my PTI Wee Folk mini kit.


I'm also linking this up to this week's

Thanks for looking!

Friday, March 18, 2016

Reverse Confetti March Spring Fling Blog Hop

Hey there, 'Fetti Friends!
I'm super excited to be sharing my project today as part of the
Reverse Confetti Spring Fling Blog Hop!
 
 
Now, some of you might remember the sweet little felt owl and fox
that I made in December as Christmas ornaments using my Reverse Confetti dies...
Well, with Easter approaching, I thought it would be fun to make some felt
bunnies for my Sunday School girls.
But this time, instead of ornaments, I made them into treat bags!
 
 
Aren't they sweet?
I'm super excited with how they turned out and can't wait to share them with my Sunday School girls!
 
Here are some close-ups and some explanations on how I made them.

 
For each bunnies' body, I started by diecutting one of the Tagged Tote Confetti Cuts, twice from felt.
Then, I diecut four ovals pieces using the handle of the Sweet Treat Tent Confetti Cuts.
With my sewing machine, I stitched the two body parts together, leaving it open where the head is.
I stitched the ears to the head and the arms to the body.
For the eyes, I diecut two of the smallest circles from Layered Snowflake Confetti Cuts
from smokey shadow felt.
For the nose, I diecut the tiny little flower sequins from Shakers 'n Frames Confetti Cuts
from sweet blush felt and then just cut off two of the petals with my scissors.
For the insides of the ears, I diecut the long petal shape from the Flowers for Mom Confetti Cuts.
To attach these parts to the bunny, I used fabric glue.
 
I filled the bunny's belly with Cadbury Mini Eggs wrapped in saran wrap.
Then, I tied a ribbon around its neck to seal in the candies, and to give the bunnies
a little more definition to their shape.
 
For four of the bunnies, I decided to add some felt carrots.

 
These I created by diecutting the triangle from Branch Out Confetti Cuts from orange
felt and then trimming off the top with scissors to it wouldn't be as long.
For the greenery, I used the Tassel Confetti Cut.
I sewed these together with my sewing machine.


I used more fabric glue to attach the carrots to the bunny's fronts and paws.

 
For a little variety, I decided to add some bows to the other bunnies' heads.

 
I diecut the bow from Tagged Tote Confetti Cuts from felt and stitched
it in place with a coordinating button.


And, as a finishing touch...

 
I hot glued a pompom to the backside of each bunny.
I did this mainly for cuteness, but was pleasantly surprised to learn
that it helps them to stand. :)


Here's the complete list of everyone participating in today's hop:

Reverse Confetti blog
Susan Liles
Fetti Friend--Nina-Marie Trapani 
Heather Pulvirenti
Kay Miller
Leigh Penner -- me!

Thanks for looking!

Thursday, March 17, 2016

CAS(E) This Sketch #164

Today, I have a card to share that I made for
 CAS(E) This Sketch #164 designed by N@ Ali:


Isn't it fun?
I immediately thought of using my MFT Basic Stitch Lines dies to make my card:


I blended some aqua mist ink onto the bottom of my panel
and stamped my sentiment from Reverse Confetti's Lots to Say stamp set.
Then, I diecut the bunny from the PTI Wee Folk Mini Kit and
adhered it to my card.
A button and twine finishes it off.

And while I was making this sweet baby card, I decided to make three others at the same time.


Visit CAS(E) this Sketch to see the rest of the DT's takes on the sketch 
and to play along, if you'd like.
You have until Thursday, March 24th to link up your card.

Thanks for looking!

Wednesday, March 16, 2016

Stencilled panel #2

As I mentioned in this post, that I took my PTI Colour Pop Florals kit, inks & blending tools
to work one day last week and stencilled three card fronts on one of my breaks
-- for those of you who don't know, I substitute teach at my local high
schools and often have a 65 minute "prep" once a day -- sometimes twice.
Since I was working so much this week, it was cutting into my crafting time,
so I decided to get crafty at work. ;) 

I shared one of the cards that I made with the panel here,
and wanted to share another one, today.


I started by stencilling the large flowers in Hawaiian shores, the smaller flowers
in bright buttercup and the leaves in mint julep.
I added the coordinating stamps to my stencilling in tropical teal,
orange zest and new leaf.


I stamped my sentiment (from SSS's Big Scripty Sentiments)
in versafine onyx black and matted my card in bright buttercup.

Thanks for looking!

Tuesday, March 15, 2016

Curtain Call Inspiration Challenge -- Rainbow


It's time for a new Curtain Call Inspiration Challenge!


The LEAD of the Rainbow Challenge will be invited as a 
Guest Designer in a future challenge!
Please visit the Curtain Call Challenge Blog for all the challenge info and deadline.
 I just love this photo!
I wanted to recreate a line of daisies in coloured water... 


I had so much fun making my card!
I knew I wanted to use the daisy die from the new
FReverse Confetti Flowers for Mom Confetti Cuts,
but I needed a vase to put them in.... I searched through my dies and found the perfect one
-- the smallest die from Stitched Flag Trio Confetti Cuts.
I blended five different colours of ink onto my "vases" and stamped -- get this! --
the broom from Cast A Spell for the daisy stems.


I diecut the banner (also from Flowers for Mom Confetti Cuts) from vellum
and layered over top of it the Hello Confetti Cut diecut from black cardstock.


Make sure you visit each of the designers' blogs for more inspiration!
for the challenge details and to play along with us!


Thanks for looking!

Monday, March 14, 2016

MFT Wednesday Sketch #271

Today, I have a card to share for the MFT Wednesday Sketch #271:


I decided to use my MFT Fall Florals stamp set and dies to make my card.


I started by stamping the flowers onto the diecuts in sweet blush, raspberry fizz,
summer sunrise, orange zest and limeade ice.
On a panel of sweet blush cardstock, I stamped the MFT Sketched Chevron Background stamp
in sweet blush and cut the panel into two pieces.


I stamped the sentiment (from MFT's Written in Watercolour stamp set)
onto my white background panel and onto my stamped sweet blush panel
and adhered them together.

Thanks for looking!

Sunday, March 13, 2016

Muse Challenge #56

Today, I have a card to share for Muse Challenge #56,
which was to be inspired by this fabulous card by the wonderful Michele Ferguson:


I love how she stencilled the bottom of her card at an angle,
which inspired me to use my new PTI Colour Pop Florals mini kit to make my card.
(I actually took my kit, inks and blending tools to work one day last week
and stencilled three card fronts on one of my breaks
-- for those of you who don't know, I substitute teach at my local high
schools and often have a 65 minute "prep" once a day -- sometimes twice.
Since I was working so much this week, it was cutting into my crafting time,
so I decided to get crafty at work. ;)  )


I started by stencilling the large flowers in Hawaiian shores, the smaller flowers
in bright buttercup and the leaves in mint julep.
I added the coordinating stamps to my stencilling in tropical teal,
orange zest and new leaf.
I diecut the happy (from PTI's Wet Paint Cuts) from my panel
and then twice from a coaster, stacked them together and added them back to my card.


I stamped my sentiment (from PTI's Wet Paint) in versamark and
heat embossed it in white on a strip of black cardstock.

Thanks for looking!

Saturday, March 12, 2016

The Challenge #63 & Make It Monday #242

Today, Jonah, Sage & I are off to a Black Belt Development Day in Miami.
Miami, Manitoba, that is. ;)

But before we go, I wanted to share the card that I made for The Challenge #63:


I love this fun sketch!
I decided to use my PTI Life is Beautiful butterflies to make my card.


I started by stamping my watercolour paper background with PTI's Text Style stamp set
in versamark and heat embossing it in white.
Then, using my watercolours, I inked up my panel.
I stamped the sentiment from Winter Woods.


I diecut my butterflies and stamped them with their coordinating stamp.
I started with the lightest colour of ink and used my MISTI to restamp it several times,
adding more ink (& eventually a darker shade) each time with a sponge.
I used Altenew's Soft Lilac & Lavender Fields, PTI's Sweet Blush & Berry Sorbet
and Altenew's Buttercream & Mango Smoothie inks.

Thanks for looking!

Friday, March 11, 2016

Reverse Confetti's Sketch for You to Try #34

Today, I have a card to share for this month's
 

I decided to use God is Good and some favourite techniques to make my card.

 
I started by masking a strip on my background and blending some Hawaiian shores ink onto it.
Then, I diecut the largest tag from Tag Me Confetti Cuts, but I ran it through
my diecutting machine only part way, then turned it around and moved the tag die
down a bit to make a longer tag to fit my sentiment.

 
I diecut the clouds and sun using Sun 'n Clouds Confetti Cuts
and inked my sun with some Harvest Gold ink.
I also blended ink onto my tag before stamping my sentiment from God is Good.


Want to play along with the March SFYTT? 
Click here for details.
 
Thanks for looking!