Friday, March 20, 2015

Five for Friday

1. There's no school today because it's parent-teacher interviews for Sage & Jonah.
As is my tradition, I made butter crunch for the teachers, which I think they'll enjoy.
I made some cute tags for them, which I'll share next month in
a "teacher-appreciation blog hop" I'll be participating in with Reverse Confetti.

By the way, I made a new "page" on my blog for recipes.
So far, I've added butter crunch. :)


2. I got to go to Brandon yesterday with Austin and Jonah's choirs.


Unfortunately, we missed Jonah's performance because we came on a later bus.
I did manage to catch a bit of the adjudication, though.
That's Jonah in the back row, on the far left.


Austin's choir sang five songs and they did a fabulous job!
On the fourth song, Austin had a large solo part -- he sang it wonderfully!
That's him in the middle, singing into the mic.


I'm so thankful that I have a job (I'm a substitute teacher) where it works for me to go
and do things like this to support my kids (& engage in their experiences).


3. I went for two bike rides this week!
Two years ago, I didn't go for my first bike ride of the season until May,
so going twice in the middle of March is a little unheard of.


A selfie of my best girl and me when we went for a walk Sunday evening.


4. I have a new show that I'm watching and really enjoying.
It's on Netflix and it's called Lie to Me.
I've been watching it with Austin. There are three seasons and we just started season 2.
Have you seen it?
I'm liking how it's making me more away of facial expressions and body language.
What shows are you enjoying right now?


5. As I shared recently in this post, Jonah's Jazz Choir is going to Banff at the end of April
and we have been doing fundraising for his trip.
In April, the choir is hosting a coffee house and they're setting up a Chinese Auction.
The choir director asked if we could donate prizes, so I made three card sets to donate.
I shared two of them here.
Here is the third set I made, using PTI's Lovely Laurel's Mini Kit.

I actually decided to just use the beautiful 4.25x5.5 patterned papers that were included in the kit
to make my set of cards.


For my first card, I diecut the two pieces of patterned paper using
Mama Elephant's Femme Frame dies.
So quick and easy!

For my next two cards, I cut the printed panels apart, as well as the grey patterned paper.
I added a tiny scalloped border using PTI's Heart Border die.


And for the last two cards in the set, I diecut the printed panels using the Shaker Shapes: Circle dies
and created a frame for them using aqua mist and Bazzill Basics Bling cardstock in Tiara.


To package them, I just put the cards, along with some envelopes in the clear box
that the Laurel Leaves kit came in.

Thanks for looking!

Thursday, March 19, 2015

Cas(e) This Sketch #115

Today, I have a card to share that I made for
 CAS(E) This Sketch #115 designed by Sam Simpson:


I decided to make a wedding/anniversary card using some
Crate Paper Open Book patterned paper and chipboard.


I trimmed my patterned paper and adhered it on an angle.
Behind the chipboard ampersand, I adhered some pink thread.
I stamped my sentiment by putting together some letters/phrases from PTI's Wonderful Words: Additions.

Visit CAS(E) this Sketch to see the rest of the DT's takes on the sketch 
and to play along, if you'd like.
You have until Thursday, March 26th to link up your card.

Thanks for looking!

Wednesday, March 18, 2015

Altenew March Challenge

Today I have a card to share that I made for
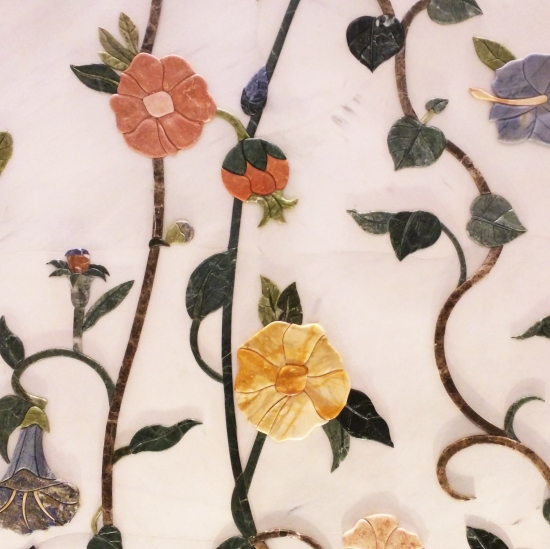
I was inspired by this photo:


The vines with the flowers immediately made me think of the branch stamp
in my new Altenew Vintage Flowers stamp set,
so I used it to make my card:


I stamped the branch in ripe avocado and the blooms in 
lemon tart/harvest gold and sweet blush/melon berry (all PTI inks).
The sentiment is from Simon Says Stamp Blessed stamp set.

Thanks for looking!

Tuesday, March 17, 2015

A couple of card sets

Today, I have a couple of card sets to share that I made using Reverse Confetti products.
Well, actually, it's not really the cards I'm sharing, but the packaging.
 

You see, Jonah's Jazz Choir is going to Banff at the end of April
and we have been doing fundraising for this trip.
In April, the choir is hosting a coffee house and there will be a Chinese Auction.
The choir director asked if we could donate prizes, so I made three card sets to donate.
Today, I'm sharing two of them.

The first card set is made up of the Shine Bright and Sun 'n Clouds Confetti Cuts cards
 that I shared here and here.


To make my packaging, I cut a piece of white cardstock to 11x2.25".
On it, I used the sun die from Sun 'n Clouds Confetti Cuts as a stencil
and applied some summer sunrise ink using my Tim Holtz blending tool.
Then, I stamped the sentiment (from Shine Bright) over top.
I wrapped the cardstock around the cards/envelopes and adhered it together in the back.

My second set of cards is a collection of the birds and bees cards that I made
recently for the Reverse Confetti Release using The Tweet Life & The Buzz,
that I posted here, here & here.


I created the packaging the same way as the first one, but here
I stamped the bees and sentiment from The Buzz in black ink.
Then, I stamped another bee on a post-it note, cut out it's body and laid the rest
of the post-it note over the bee to apply some summer sunrise ink using my Tim Holtz blending tool.


Thanks for looking

Sunday, March 15, 2015

Muse #108

My friend, Michele is hosting Muse Challenge #108 and invited me to play along.
Her gorgeous card was very inspiring...


Isn't it lovely? 
I love the mustard, gold and black!
I immediately thought that I would use Altenew's Painted Flowers 
with black outlines and the insides stamped in mustard.
I had the designed planned out and everything...
so you can imagine my extreme frustration when I worked on this card for over
an hour on Tuesday evening... and nothing went right!

First of all, I stamped my black outlines on a Pretty Pink Posh stitched rectangle diecut.
Then, I went to stamp my mustard centres using some Heidi Swapp Mustard ink
and it was all greyish.
Yuck!
So, I started over...

The second time I did better, repeating my process, and the first mustard centre
looked great..... but the second one not so much. Grrr!

On my third attempt, I decided to use my MISTI and use the placement
from the second diecut as my guide.... but started with my centres.
This went well... I did my two layers of centres, stamped my black outlines,
and my sentiment and just went to add one last stamp....
and for some reason, grabbed the first attempt to line it up and not the second.
(I'm going to blame this on Sage. She was sitting at her craft table
playing Lego Friends and was talking to me and distracted me. ;) )
Anyway, the last tiny bloom was stamped in the wrong place!
I was so frustrated that when Austin came downstairs to ask if I wanted to watch an episode
of Lie to Me on Netlix, I said yes and abandoned my craft table.

The next afternoon, however, I got some courage and decided to finish the card.
I started by tossing out the first diecut into the garbage, so I wouldn't make the same mistake.
Then, I diecut two Pretty Pink Posh stitched rectangle diecuts and made two panels,
using my MISTI, starting with the centres stamped in mustard. 
This way, I figured if I screwed up again (yes, I admit, it was my fault, not my darling daughter's!)
then I wouldn't have to start all over again.

Well, the good news is that both panels turned out, so I ended up making two cards.

The first card uses a piece of Fancy Pants patterned paper as my background.
The white panel is matted on a piece of Heidi Swapp patterned paper
and the sentiment is from Wplus9's Fresh Cut Florals.


Here's a close up of my panel:


(See the little sprig right below the sentiment? That's what I messed up on my previous attempt.)

And this card also uses some Fancy Pants patterned paper as the background.
The white panel is matted on PTI true black cardstock.


The sentiment is from Simon Says Stamp's Blessed stamp set.


Thanks for looking!

Saturday, March 14, 2015

Make It Monday #204: watercolour smooshing

Well, today I am off to a Taekwondo Black Belt Development Day 
with Jonah and Sage, but before I leave,
I just wanted to share the cards that Sage & I made for 

First, here's my card:


I started by smooshing some sweet blush and aqua mist inks onto my stamper's select white panel.
I stamped my sentiment (from Bitty Bouquets) and framed it with a Keep It Simple frame die.
I stamped my Bitty Bouquets flowers on their coordinating diecuts and 
added some directly onto the background as well.
A couple of buttons adhered with rustic cream button twine finishes it off.


Sage's friend had a birthday this week, which Sage told me about the evening of her birthday.
I suggested she make her a card.


She stamped the little fox (from Mama Elephant's Three Amigos) and watercolored it using
some Terracotta Tile ink pressed onto an acrylic block spritzed with water.
She really loved this technique!
She stamped the "sorry" (also from Three Amigos) along with the "foxy" from PTI's Hey Foxy.
The sentiment along the bottom is from KIS: Belated Birthday.
I helped her to add the shadow with some grey ink spritzed with water to ground him a little.
She wanted to use my Tim Holtz ink blending tool to add some blue for the sky,
but when she saw the card I'd made, she asked if she could try smooshing.
I was hesitant, since this technique has been hit or miss for me, but one thing 
I've learned it to add lots of water. 
So we inked up the back of my stamp press and spritzed it about five times. 
Sage pressed the cardstock into the watered aqua mist ink and voilà!
It turned out really great!

Thanks for looking!

Friday, March 13, 2015

Five for Friday

It's been a while since I posted a Five for Friday post....

1. I am loving that spring is starting to arrive!
We've had temperatures above zero this week and the snow is melting!
I'm thinking I'll probably be able to take out my bike on the weekend...


2. With spring's arrival, I've been daydreaming about spring clothes!
I've ordered two pairs of pants and can't wait to wear them....
I got these from Ricki's (click!) and these from Old Navy (click!).
I'm thinking they will both look great with navy tops (including this one that I got from Ricki's)
Now, I'm on the hunt for some cute navy flats....


                                           3.

Did you know that I have been a designer/educator for Paper Crafter's Library for
about a year now?
This means that I make about 6 or 7 videos a month for Paper Crafter's Library
and they post them on their site, along with PDFs with supplies, instructions, etc.
It's been such a great experience and I'm really enjoying it!
If you're interested in seeing the projects/videos I've made for PCL, click here.


4. I want to share a card that was posted earlier this week on the Chickniddy Crafts Blog
that I made using some Chickaniddy Crafts Scrumptious products.


I trimmed my Chickaniddy Crafts Scrumptious patterned paper to 4x5.25" and diecut a heart using 
the largest heart dies from Reverse Confetti's Heart to Heart Confetti Cuts from the patterned paper.
I diecut three more hearts from white cardstock.
 I adhered my patterned paper panel (sans heart) to a 4.25x5.5" panel of white cardstock, and stacked the three hearts and adhered them in the spot where the patterned paper heart was removed.
 I stamped the "love" from the Date Night Clear Stamps on the patterned paper heart
and adhered it over the cardstock hearts.
 I diecut my "sending" (from PTI's Wet Paint Cuts III) from black cardstock and adhered it to my card.

Here's a photo from the side, so you can see the dimension the stacked hearts add to the card. 


5. And, I also want to share a card that I made for The Card Concept #30: Thinking of You:


I love this gorgeous photo and just had to create a card for it!
My card style is Clean & Layered.

Here's my card:


I started by stamping the jar from Lawn Fawn's Summertime Charm stamp set
and heat embossing it in white.
I repeated this with the sentiment (from Wplus9's Fresh Cut Florals) and 
the swirls (from PTI's Hanging by a Thread stamp set).
I stamped the jar onto a post-it note and cut it out by hand, using it as a mask for my jar
while I applied some sweet blush ink to my background using a Tim Holtz blending tool.

I stamped my PTI Bitty Bouquet flowers both on the background and on the coordinating diecuts.
I cut a slit at the top of the jar and insert the stems into it.

Here's a close-up of the embossing on the jar.


Thanks for looking!

Thursday, March 12, 2015

cas(e) this Sketch #114

Today, I have a card to share that I made for
 CAS(E) This Sketch #114 designed by Gayatri Murali:


Isn't this cool?
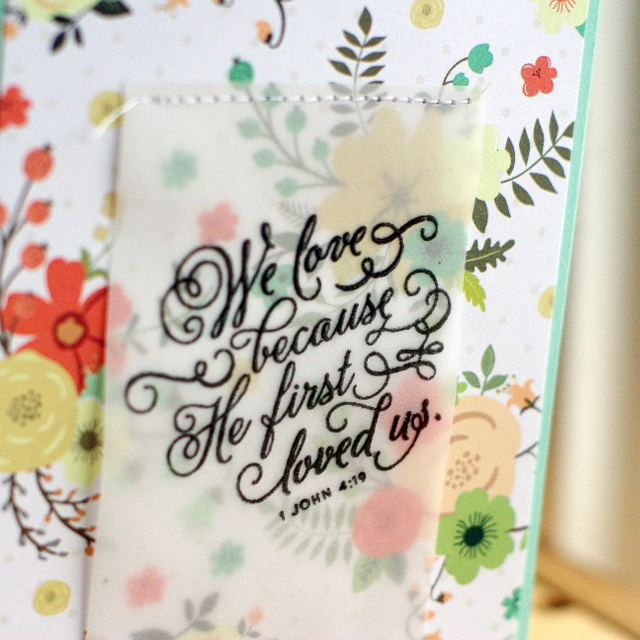
I decided to use some Teresa Collins patterned paper and some vellum to make my card.


I matted the patterned paper on aqua mist cardstock.
I stamped the sentiment (from Simon Says Stamp's Blessed stamp set) in versa fine on vellum and heat embossed it in clear.
Then I stitched it to my card along the top.


Visit CAS(E) this Sketch to see the rest of the DT's takes on the sketch 
and to play along, if you'd like.
You have until Thursday, March 19th to link up your card.

Thanks for looking!

Wednesday, March 11, 2015

Bazzill Basics Blueprint: Lucky Me

Hi there!
I'm just popping in today to let you know that 
I'm up on the Bazzill Basics Blog today, using a Bazzill Blueprints sketch.
And once again, I'm using one of the fabulous new foil board colours.
Check it out:


Isn't that new foil gorgeous?
It looks even better in real life!

Thanks for looking! 

Tuesday, March 10, 2015

Hello, Sunshine

Today, I have a card to share that I made using some goodies from Reverse Confetti


To make my card, I applied some summer sunrise ink to my background using
my Tim Holtz blending tool.
I took a Quick Card Panels: Spring Fling and partially ran it through my Big Shot with the clouds from Sun 'n Clouds Confetti Cuts, stopping before I cut into the sentiment.
I diecut a few other clouds from the Quick Card Panel  and adhered them to my card,
along with a sun that I diecut using Sun 'n Clouds Confetti Cuts from summer sunrise cardstock.


Thanks for looking

Monday, March 09, 2015

Chickaniddy Crafts: white space

Today, I have a card to share that I made using one of my favourite elements: white space.
I've always been a huge fan of white space on cards and scrapbooking layouts
 -- it allows the eye to rest and draws more attention to the elements on your project.

To make my card, I used some Chickaniddy Crafts Scrumptious products.

I paired a diecut from the Scrumptious Diecut Tags with some stickers from the Scrumptious Illustration Stickers.


Here's my card:

 I started with some white cardstock that I layered over a piece of Scrumptious Friends and Family patterned paper that I trimmed to 4.25x5.5".
 I cut a piece of Scrumptious Check Please patterned paper to 1x4" and adhered it to the top of the white cardstock and stitched it in place with a zig zag stitch.
 I diecut a banner from the back of the Scrumptious Check Please patterned paper (with PTI's Get a Handle on It) and layered it on my card with the diecut from the Scrumptious Diecut Tags 
(on this, I stamped the sentiment from Twirly Girly Clear Stamps.)
 The diecut I used already had a flower at the top, so I added a couple more from the Scrumptious Illustration Stickers.
I wanted to add a couple more leaves, so I used a leaf diecut from my collection (PTI's Turning a New Leaf) 
and diecut the green stalks from the corn stickers on the sheet -- this worked perfectly!

Here's a close-up:


How about you?
Do you like including white space on your cards?

Oh, and before you go, I have another card on the Chickaniddy Crafts blog today, 
if you'd like to check it out.

Here's a peek:


Click here to see more.

Thanks for looking!

Sunday, March 08, 2015

Reverse Confetti New Release Blog Hop


Hey there, 'Fetti Fans!
Welcome to the Reverse Confetti January New Release Blog Hop!


The hop started over on the Reverse Confetti blog and you should have made it here from Amy Sheffer's blog
It would be worth your while to start at the beginning of the hop, so you don’t miss a thing. 
We have tons of inspiration for you to see using all of the new Reverse Confetti stamp sets & dies!

For my blog hop project, I decided to pair one of the new stamp sets
(with its matching confetti cuts): The Tweet Life
with one of the new Quick Cut Panels: Spring Fling.
Here's my card:


To make my card, I started by lining up the two The Tweet Life Confetti Cuts along the top of my
 white cardstock panel and ran them partially through my diecutting machine from the top.
I used a craft knife and a ruler to trim off the top.
I stamped my images (those little birds are just so cute!) and sentiment (all from The Tweet Life) and then heat embossed them in clear, before watercolouring them with some ink
that I pressed onto my craft mat and spritzed with water.
The rainbow stripes from the Spring Fling Quick Cut Panel is such a fun backdrop for them!


I hope you’ve enjoyed hopping with us today!
Be sure and join us on the 8th of every month for more Reverse Confetti inspiration! 

Now it’s time to hop on over to Amber Hight's blog
If you get lost along the way, you can find the hop order and
list of all the participating designers over on the Reverse Confetti blog.

A few things before you hop along though, just to keep you “in the know”…
The March Sketch For You To Try is open for you to play along.  
Click here for a chance to win and to become our newest 'Fetti Fave.  
Thanks for looking!