Well, I finally made a layout with Sketch #12 from Kelly Purkey's Sketchbook 4 workshop.... this means that I made a card & layout for all twelve sketches! I'm really glad that I signed up for this workshop-- there were some really great sketches that I'm sure I'll use again!
Sketch #12 worked really well for combining with this week's Make It Monday at Papertrey Ink: background patterns from patterned paper scraps (a challenge that's right up my alley!) Here's the layout I made, using scraps of The Girl's Paperie patterned paper:
I also used Papertrey Ink cardstock (harvest gold, raspberry fizz), felt (raspberry fizz), twine, stamps (Wonderful Words Additions) & dies (Script Alphabet, Heart Border, 3.5" limitless layers ovals, fillable frames #9). The blue decorative brad is MME and the larger one is an SU! build-a-brad.
Here's a close-up of the journaling (Sage recited the list to me at lunch time.)
A few weeks ago, inspired by a post I saw on the PTI forums, I headed to Staples to see if I could revamp my die storage system. I ended up buying a Martha Stewart 8.5x11" binder....
The binder had a pocket in the front, in which I store a sheet of Sizzex adhesive that I use mainly for my alphabet dies.
I purchased some Martha Stewart page protectors that have four pockets per page. However, my PTI border dies didn't fit in these, so I used a Tim Holtz stamp folder and a sheet of cardstock with two magnet strips adhered to it for these. I re-punched the holes in the folder so it would fit in the binder.
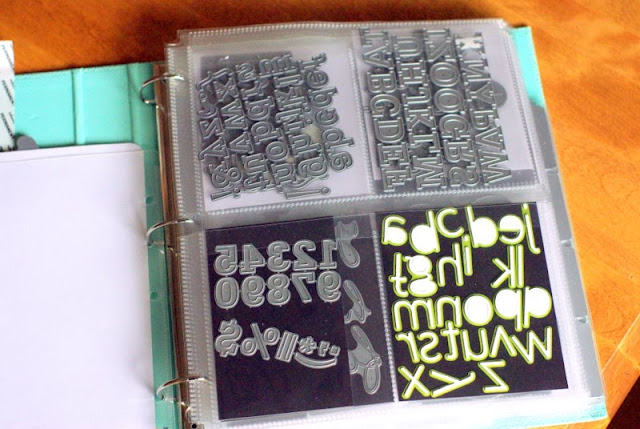
In the front, I decided to store my PTI alphabet dies and a set of Quickutz alphabet dies (Reuse). I haven't separted my alphabet dies, so these I just slide into a pocket. For the Reuse dies, they're separate, so I cut a magnetic sheet to fit the pocket and store the dies on that, before sliding them in.
On the next page protector, I have my new PTI script alphabet dies. Since these didn't fit in a pocket, I split them into two sections and store each one in their own pocket. For my Wonderful Words dies, I have them on a magnetic sheet.
After my alphabet/word dies, I have my frame dies. Most of these fit one per pocket. However, for my fillable frame dies, I decided to save space and store two per pocket. I cut a piece of white cardstock to fit the pocket and put adhered two magnets to the cardstock. This way, the dies stay in place as the binder gets handled.
For the sets that had four or more dies, I used a magnetic sheet in the pocket to stick the dies to. For three or less dies, I used a sheet of cardstock with magnets adhered to it.
After my frame/label dies, I have my flowers...
...and leaves. For my Rosie Posie dies, they didn't all fit in one pocket, so I store them in two pockets, side by side. I've also been storing extra diecuts in the pockets.
Then come my miscellaneous sets...
And in the last page protector, I have my Christmas dies.
Then I used a few more Tim Holtz folders to store my Woodgrain impression plate, Quatrefoil die, shim and embossing pads.
My Edgers #5 dies didn't fit in the pockets, so I used a Tim Holtz folder with magnetic strips on a piece of white cardstock for those...
... as well as for my Edger #3 dies and my Lunchbox Note die.
Then, at the back, I repunched hole in my Quickutz alphabet die folders and added them to my binder...
And that's it. It looks bulky, but it actually doesn't take up that much room and I'm finding it easier to keep everything in its place. I'm really happy with this system!
Thanks for looking!
Subscribe to:
Post Comments (Atom)


11 comments:
I like how organized the dies are in the binder. What cutter do you use?
Great idea..look at all those dies you have. I'm seeing some Quickutz in there. I have a bunch of those too. I used them all the time when I did scrapbooking.
storage, what? I had fun just looking at all of your dies! hee hee. awesome!
Thanks for posting how you store your dies. And now I want to come play at your house! :) Have you noticed the weight of the pages causing any problems? I'm still undecided on how to fix mine but I really appreciated seeing how you set yours up. Looks great!
I recognize this binder, I bought it to use as my wedding organizer :) Great storage system! Must be such a great feeling to complete the workshop, and love your take on #12!
Congratulations, Leigh, for completing all the layouts & cards in your class! (you're making me want to take a class :) the sketches are awesome!) your layout above is gorgeous! I love the colors - very pretty!
Great die storage! Am wary myself of using binders as i didn't too well with using it with my stamps :)
Love that you made a scrapbook page, Leigh. It's so charming! And how nice to have a good form of organization going with your dies!
This is gorgeous! And I am completely jealous of your die storage. I wish I could just mail all my dies to you and have you make beautifully organized for me. :) Congrats on completing your class. It's truly an accomplishment and I'm so glad you took it because I've loved all your projects.
WHAT? You haven't separated your dies yet?! Hehe, I kid I kid. But I'm in love with your dies (and storage)... but those dies ♥3♥
I am jealous ;-) wish my dies would organize themself in such a neat "union" too.
Thanks for getting back to me, Leigh. I'm still struggling to find the perfect system. I had tried the binder a bit, it didn't seem to work well for me. I'm using the clear sleeves now but I still need some organization.I'm having my new craft room designed by the local Home Depot designer now, but I thought of you when I first started. If you only lived close!
Post a Comment